
Install Nginx Raspbian, and accelerate your Raspberry web server
ⓘ Cet article peut avoir été partiellement ou totalement traduit à l'aide d'outils automatiques. Nous nous excusons des erreurs que cela pourrait engendrer.
Today we write a tutorial to complete the one dealing with the installation of a web server on the Raspberry. Indeed, it will be here about the installation of a web server other than Apache, namely Nginx.
What is Nginx?
Before installing Nginx, you need to understand what Nginx is.
Nginx is a web server.
It thus allows a client to access a resource on a remote machine, and to this machine to return the resource adapted to the client. This is free software, distributed under a BSD license. It was born in 2002, in Russia, but it really only developed from 2006, when it began to be translated from Russian to English.
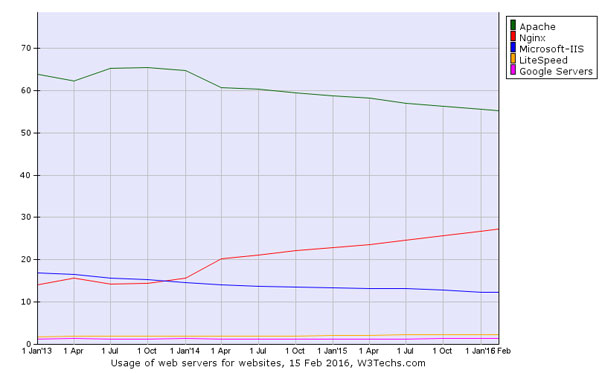
Nginx rises quickly, here the evolution of market share of web servers in 2016 – source: w3techs.com
Nginx accounts for 20.4% of servers. It’s much less than its main competitor Apache, which represents 60.6% of market share, but it’s still huge. It occupies the second place of the server, which is a performance all the more important that the competitor Apache occupies an absolutely huge historical place, and is a major actor, Not only through its server, but also through the Apache license.
But why install Nginx rather than Apache?
This is of course the most important issue. Why choose a secondary server rather than the main player in the market? The answer is simple, performance!
Nginx is an “Asynchronous” server. This means that it can perform several actions at the same time, without waiting until the end of the first to move to the second. This is not the case with Apache, which if it allows multiple queries at the same time will then launch new processes.
In short, it means three things.
First, Nginx responds much faster than Apache.
Secondly, Nginx can support more users simultaneously.
Third, Nginx consumes less RAM than Apache, which is very important considering that Raspberry, even in its model 3, has only 1024MB of non-extensible RAM. This is all the more important in the context of the B + model and its 512 MB of RAM.
So you suspect that all this is not without consideration.
Nginx does not always react as Apache2 with PHP.
It is not as easy to test Nginx as Apache on a Windows machine.
Finally, Nginx does not support .htaccess files, which you will have to convert to Nginx, and that you will not put in a file in the target directory, but in the site configuration file.
However, Nginx is really worth it, and it’s probably a better choice than Apache for a web server on the Raspberry.
Disable the Apache server
We will consider here that you have already followed the tutorial on the installation of an Apache web server, with PHP and MySQL. Therefore we will not reinstall the last two, and we will deactivate the first one, but do not uninstall it. This will be our first step. If you have not installed an Apache server, you can skip this first step.
First, you should disable the Apache server currently running.
To do this, simply use the following command:
sudo /etc/init.d/apache2 stop
The Apache2 server is no longer running. We will now prevent it from automatically starting at Raspbian startup as it does for now.
Do not launch Apache at startup
On the latest versions of Debian (and therefore Raspbian), systemd took precedence over the traditional method of service management.So we’ll disable Apache on startup. To do this, simply run the following command:
sudo systemctl disable apache2
If you wish, you can restart your Raspberry Pi
Automatically launch Apache at startup
It is possible that you want one day to re-enable automatic startup of Apache. To do this, you will have to use the same command as to deactivate it, but with different arguments:
sudo systemctl enable apache2
This time the “enable” argument will ask the program to run Apache2 when the server starts.
Note that you can not (by default) cohabit Apache and Nginx!
You now know how to enable or disable the automatic startup of Apache and we will now be able to install Nginx.
Install the Nginx server for Raspbian
As we did for Apache2, we will again use the “aptitude” package manager to install Nginx and php-fpm on the Raspberry from the Raspbian repositories.
To do this, simply use the command:
sudo apt install nginx php-fpm
By default, Nginx is not bound to PHP. During the development of Nginx, the choice was made to use PHP-FMP (a faster version of PHP) rather than a more traditional PHP. Therefore, we will install php-fpm to manage PHP files with Nginx.
You can check if your server is working properly in the same way as to check if an Apache server is running, ie by running a query on port 80 of your server. You will then get a page marked “Welcome to nginx! “.
You can check if your server is working properly in the same way as to check if an Apache server is running, ie by running a query on port 80 of your server. You will then get a page marked “Welcome to nginx! “.
Configure Nginx
Now that Nginx is installed, it will be necessary to add a little bit of configuration. We will not explain here how a Nginx server is configured, we will simply modify the folder containing your sites, add the index.php pages as default pages, and finally add PHP.
To do this, edit the file “/etc/nginx/sites-available/default“, for example via the command:
sudo nano /etc/nginx/sites-available/default
And look for the line
index index.html index.htm index.nginx-debian.html;
To replace it by the line
index index.html index.htm index.php;
This will add an automatic redirection to the “index.php” files for the site folders, Apache’s default behavior.
We will now activate php-fpm for Nginx. To do this, look for the lines
#location ~ \.php$ {
# include snippets/fastcgi-php.conf;
#
# # With php5-cgi alone:
# fastcgi_pass 127.0.0.1:9000;
# # With php5-fpm:
# fastcgi_pass unix:/var/run/php/php7.0-fpm.sock;
#}
And modify them in order to obtain the following result:
location ~ \.php$ {
include snippets/fastcgi-php.conf;
 fastcgi_pass unix:/var/run/php/php7.0-fpm.sock;
}
All that remains is to modify the rights of the folder “/ var / www / html” in order to manage our sites more easily. To do this, simply run the following commands:
sudo chown -R www-data:pi /var/www/html/
sudo chmod -R 770 /var/www/html/
Finally, we will add an “index.php” file to verify that PHP is working. To do this, run the following command:
echo "<?php phpinfo(); ?>" > /var/www/html/index.php
Once all this is done, you must restart Nginx, in order to apply the changes, always with the command:
sudo /etc/init.d/nginx restart
All you have to do is verify that the server is functioning properly, as before. You should get a page displaying PHP information.
Error 403 forbidden, a classic of Nginx.
It is possible that you get a “403 forbidden” error. This can mean two things.

Error 403 is common with Nginx, but simple to fix.
First, it may mean that Nginx can not find a file to display, but unlike Apache, it will not list the files in the folder. To test this, just create an index.html file in the “/var/www” directory, and re-try to access your site. For example, using the command:
echo 'Nginx work’s !' > /var/www/html/index.html
If the problem came from there, you should get a page labeled “Nginx work’s! ” Now you can put an index file that suits you.
On the other hand, if this does not resolve the problem, then the problem is probably that Nginx can not access the directory “/var/www/html”. In this case, the directory must be given to “www-data”, with sufficient permissions.
To do this, use the following two lines:
chown www-data:www-data /var/www
chmod 744 /var/www
Conclusion
Here, Nginx is installed on the Raspberry, and your Raspbian web server should run even faster than before!
And if that’s not enough, you can for example install a php cache. We’ll perhaps write a tutorial on it in a while;).
And in any case, you can always go here, and you may find new ideas of uses for your Raspberry.


Merci beaucoup.