
Install WordPress on a Raspberry Pi (with Nginx).
ⓘ Cet article peut avoir été partiellement ou totalement traduit à l'aide d'outils automatiques. Nous nous excusons des erreurs que cela pourrait engendrer.
Today we will talk to you about wordpress, the most popular CMS in the world (not to mention the fact that it runs Raspbian France) and see how to install it on the Raspberry Pi.
The Raspberry / WordPress compatibility exists since the beginning, nevertheless, the performances on the first Raspberry Pi were not incredible!
Today, with the Raspberry pi 3 and the Raspberry Pi 2, it’s ancient history! Their processors and the RAM mounted at 1GB offers us the possibility to run more than correct way a wordpress site under Raspbian!
Install the server on your Raspberry Pi
Besides the classic commands of updates that should be executed before any installation, we will have to install a web server as well as PHP and MySQL on the Raspberry Pi.
Here we choose to install Nginx. Indeed, if it is a little more complicated to configure than Apache, it is also significantly faster, which will be a real advantage on a Raspberry Pi.
sudo apt-get update upgrade
sudo apt-get install -y nginx php php-fpm mariadb-server php-mysql
With this command, all necessary repositories will be installed, namely Ngnix, PHP and finally MySQL which is the database used by WordPress.
During the installation, you will be asked for some information, in particular the name and the password of the MySQL account, memorize well the information given, they will be useful thereafter!
Once the installation is complete, you will need to configure Nginx. To do this, see the “Configure Nginx” section of our Install Nginx Raspbian tutorial, and accelerate your Raspberry web server.
Creating a database for WordPress on the Raspberry Pi
Following this installation we will have to create a database for the future WordPress site hosted on the Raspberry Pi.
sudo mysql --user=root
Let us explain this command quickly. “sudo” allow us to execute the command as administrator when “mysql” requests a connection to the database server, “-u” is used to report the name of the MySQL account to use (here the root account).
Now, we will define the password to use for MySQL. Once connected to MySQL, run the following commands :
DROP USER 'root'@'localhost';
CREATE USER 'root'@'localhost' IDENTIFIED BY 'password';
GRANT ALL PRIVILEGES ON *.* TO 'root'@'localhost';
Those commands will delete the default MySQL user (who have no password) and create a new account whith the password of our choice. For that, replace password by the password you want to use for MySQL.
Création de la base pour WordPress
Once this is done, you will be connected to MySQL (you should see at the beginning of the line “mysql>”) with the following command :
mysql -u root -ppassword
Now, we will create a database for WordPress. To do this, use the following command:
create database wordpress;
Here, “wordpress” is the name of the database that will be used, you can put another name if you wish, but you will have to consider this difference in the continuation of the tutorial.
Creating a dedicated user for this database
A good habit to take when using a database is to separate the different tables between several dedicated users.
This increases safety! Indeed, if a person succeeds in taking control of your site because of a security breach (it can always happen), two situations are possible.
- You use a single MySQL user, root, with all rights to all tables. The attacker will thus be able to recover not only the data of the attacked site, but also the data of all the other sites.
- You use a MySQL user per site that owns rights only on the basis of this site. The attacker will be able to recover only the data of this site!
Here, we will create a dedicated user for your WordPress site.
To do this, simply run the following command:
GRANT ALL PRIVILEGES ON wordpress.* TO "username"@"localhost" IDENTIFIED BY 'password’';
In this command, “wordpress” is the name of the database, “username” the name of the user you want to create and “password” the user’s password! So you adapt according to your preferences!
You can now quit MySQL with Ctrl + d.
Download WordPress on Raspberry Pi
Now that our database is ready and our Nginx server is installed, we will be able to download WordPress!
First, we will go to the root of the server, which is, if you followed our tutorial on Ngnix, located in /var/www/html, then we will download the latest version of WordPress. To do this, run the following command lines:
cd /var/www/html
sudo wget http://wordpress.org/latest.tar.gz
Then we will extract the content via the command “tar”.
sudo tar xzf latest.tar.gz
sudo rm -rf latest.tar.gz
A new folder will be created during the extraction, the “wordpress” folder. We have removed the archive, which is now useless.
We will ensure that Nginx has access to the file. To do this, run the following command:
sudo chown -R www-data /var/www/html/wordpress
Configure Nginx to redirect queries to WordPress
For your site to be accessible from the internet with the URL of your choice, and for the requests to be all processed by WordPress, you will have to modify somewhat the configuration of Nginx.
To do this, we will start by writing the file “/etc/nginx /sites-available /wordpress”. This file should contain the following code:
server {
 listen 80;
 root /var/www/html/wordpress;
 index index.php;
 server_name < your_site_name > www.< your_site_name >;
 access_log /var/log/nginx/< your_site_name >.access_log;
 error_log /var/log/nginx/< your_site_name >.error_log
 notice;
 location / {
  try_files $uri $uri/ /index.php?$args;
 }
 location ~ \.php$
 {
  include snippets/fastcgi-php.conf;
  fastcgi_pass unix:/var/run/php5-fpm.sock;
 }
}
Of course, replace <your_site_name> with the appropriate values. If you do not have a domain name, you can replace it with the IP address of your Raspberry Pi for the “server_name” field.
Once the file is saved, you will make a symbolic link to activate the setting. To do this, simply use the following command line:
ln -s /etc/nginx/sites-available/<your_site_name> /etc/nginx/sites-enabled/<your_site_name>
All you have to do now is restart the Nginx server with the following command:
/etc/init.d/nginx restart
First connection to WordPress on your Raspberry Pi
We will now connect to the WordPress for the first time to finalize the installation.
In the browser, we will type the ip of the Raspberry Pi (you can find the IP in the configuration of your box).
In our case for example, this gives http://192.168.1.24
You should then arrive on the next page.
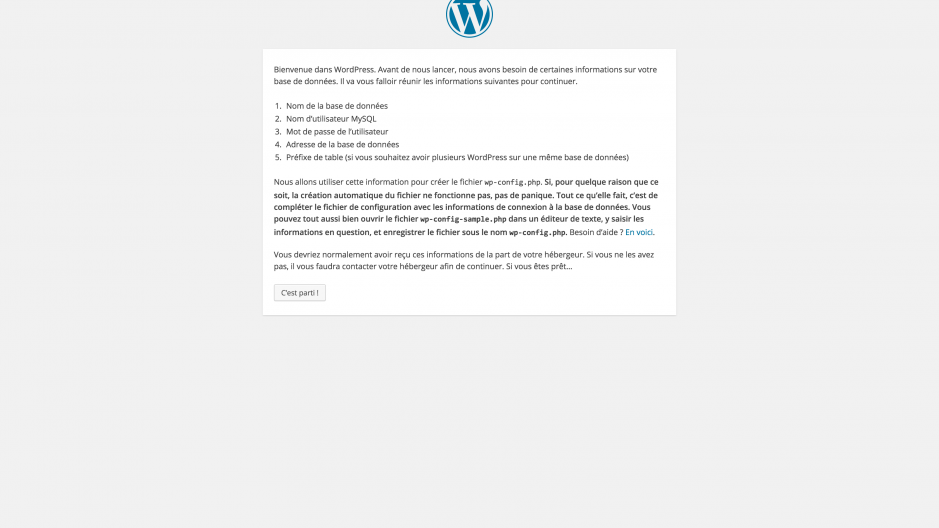
When you first start WordPress you will find yourself on the installation page
You just have to follow the steps one after the other in order to complete the installation of WordPress on the Raspberry Pi.
Conclusion
You now have a great WordPress site on your Raspberry Pi which is accessible locally!
All you need to do is check out our tutorial on fowarding port and dydns, to see how to make it accessible from the internet!
The performance of the Raspberry Pi 3 should greatly improve those of the site compared to previous versions, and for a healthy Raspberry Pi, go on our article about the choices of accessories!


I had incompatible version issues with php-fpm with this guide.
well, it is easy once I find the causes of the error, however; it took me a day to realize the php-fpm compatible issue with your guide.
At the bottom you have:
All you need to do is check out our tutorial on fowarding port and dydns,
This link does not exist.
Actually the tutorial only exist in french right now. But i’m sure you can find an equivalent in english somewhere in the vast internet ^^
Hey man,
just tried this on the latest version of raspbian lite, it installed apache2 too!!!
and when i try to disable apache and start nginx, apache get started again and all i get is the apache default page!
what do you think is the problem?
Hello, i presume the problem is Apache restart at reboot. I’m pretty sure we have made a tutorial where we explain how to disable Apache at startup, but cannot find which one :/
Hi, when entering the link ‘ln -s /etc/nginx/sites-available/ /etc/nginx/sites-enabled/’ there is a syntax error “bash: syntax error near unexpected token ‘newline'”
Please can you help?
Hey, looks like a typo, maybe a problem with copy/paste, you should try to type it all by yourself.
By the way, just to be clear, you must add your website name after “/etc/nginx/sites-available/” !
needs to be updated for raspian stretch
Thanks, we updated it.
root@RPi3:/home/pi# sudo apt-get install -y nginx php5 php5-fpm mysql-server php5-mysql
Reading package lists… Done
Building dependency tree
Reading state information… Done
Package php5 is not available, but is referred to by another package.
This may mean that the package is missing, has been obsoleted, or
is only available from another source
Package php5-mysql is not available, but is referred to by another package.
This may mean that the package is missing, has been obsoleted, or
is only available from another source
E: Package ‘php5’ has no installation candidate
E: Package ‘php5-mysql’ has no installation candidate
[1]+ Done sudo apt-get update
It’s fixed, php5 is not in main repository anymore, you need to use php7.