
How to make a Tor router with the Raspberry Pi.
ⓘ Cet article peut avoir été partiellement ou totalement traduit à l'aide d'outils automatiques. Nous nous excusons des erreurs que cela pourrait engendrer.
If you're a little familiar with online privacy issues, you're probably familiar with the Tor Project which aims to create an encrypted and anonymous internet network.
In this tutorial we will see how to turn your Raspberry Pi into a Tor router to connect to over Wi-Fi to encrypt all your traffic and hide your IP address.
The necessary hardware to create your own Tor router over Wi-Fi.
Building your Tor router ultimately requires relatively little hardware. So, you will only need the equipment below:
- A Raspberry Pi with Wi-Fi (model 3B and newer), or with an additional Wi-Fi dongle. Personally, I prepared this tutorial with a Raspberry Pi 4 to take advantage of the 1 Gb / s Ethernet port.
- An SD card with Raspbian installed on it (16 GB is more than enough).
- The Raspberry Pi charger
- Ethernet cable
You will also need to be able to connect to the Raspberry Pi to type commands, either with a keyboard / mouse, or in SSH.
A Tor proxy with the Raspberry Pi, what for?
The objective of this tutorial will be to design a router to which you can connect over Wi-Fi in order to act as a Tor proxy between you and the world to easily encrypt and anonymize all your internet traffic.
The idea will therefore ultimately be to have two Wi-Fi networks at home. The classic network, from the internet box of your access provider. And the secure network, which you can connect to when you want to make sure that no one comes in to walk in your business.
There are plenty of good (and even bad) reasons to keep your traffic a secret! Let me be clear, we all have something to hide.

The advantage of using a permanent Wi-Fi network rather than the Tor browser is that it is much easier to switch to it quickly and pass all of your internet traffic through Tor.
By the way, using Tor is also the only way to access the network. .onion, or as our friends in the media would say "The dark web", scary music, image of a guy with a back with a hoodie in front of a screen with 1's, 0's and skulls. Because it is known, the hacker is a little cautious, which prompts him to wear a hoodie, plus a balaclava, indoors, lights off, by 40 ° C in the shade …
This being clear, all we have to do is turn our Raspberry Pi into a Tor router!
Enable Wi-Fi for your country.
Before going any further we will have to start by activating the Wi-Fi on your Raspberry Pi if this is not done by default. Indeed, since some versions of Raspbian, Wi-Fi has been disabled by default and is blocked by software as long as you have not activated the Wi-Fi network for the country in which you use it.
To do this, run the command:
sudo raspi-configThen go to the game Localisation Options, Change WLAN Country and finally choose the country adapted to your case. All you have to do is validate these choices.
Install Hostapd to turn the Raspberry Pi into a hotspot.
The first step in making a Tor router is to make a router. That is to say transform your Raspberry Pi into a machine capable not simply of going on the internet, but also of serving as a bridge to provide internet to other machines.
To build a router with a Raspberry Pi the best solution is to use the Hostpad software, for "Host Access Point Deamon", which allows you to transform a network card into an access point.
So start by connecting your Raspberry Pi to your box via Ethernet (if you use a Wi-Fi dongle, also connect it to your Raspberry Pi), turn it on, connect to it and open the terminal. We will start by updating the list of repositories with the following command:
sudo apt update
Once your Raspberry Pi is ready, we will create a folder tor_wifi on the Pi, move to this folder, download a script named install_hotspot.sh allowing you to install Hostapd, make the script executable and finally run it as an administrator.
It would of course be possible to do the same thing entirely by hand, but it would take quite a long time, so take advantage of what already exists. If you're interested, you can just open the file in your text editor to see all the commands it performs.
mkdir ~/tor_wifi
cd ~/tor_wifi/
wget https://raspberry-pi.fr/download/tor_wifi/install_hotspot.sh -O install_hotspot.sh
chmod +x ./install_hotspot.sh
sudo ./install_hotspot.sh
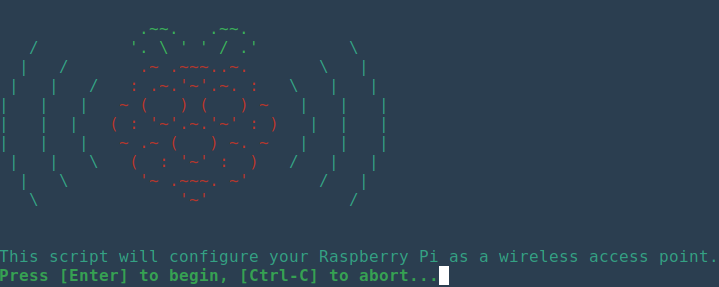
You just have to follow the instructions of the script:
- Do "Enter" to start the script.
- Type in the name you want to give to your Tor Wi-Fi network.
- Type the password for the Tor Wi-Fi network. Attention, 8 characters minimum, otherwise you will have a bug!
- Confirm the password
The Raspberry Pi will now restart on its own. Once restarted, you should be able to see the name of your new Wi-Fi network in the list of your available networks.
Add Tor to our Wi-Fi router to encrypt all our internet traffic!
Now that we have transformed our Raspberry Pi into a Wi-Fi access point, we just have to add Tor to it in order to have a working Wi-Fi Tor router on Raspberry Pi, an Onion Pi.
To do this, we will again download and run a script, which this time will install Tor and pass all the traffic received by the Raspberry through Tor to the outside world.
By the way, note that this script redirects all your TCP traffic through Tor, with the exception of traffic on port 22, ie the one dedicated to SSH. This exception is there so that you can easily manage your Tor router from a PC connected to the network.
Reconnect to the Raspberry Pi and play the commands below:
cd ~/tor_wifi/
wget https://raspberry-pi.fr/download/tor_wifi/install_tor.sh -O install_tor.sh
chmod +x ./install_tor.sh
sudo ./install_tor.sh

Again, press "Enter" to start the script, and all you have to do is wait. At the end of it, the Raspberry Pi will restart automatically.
Once the Pi is restarted, you should see your Tor Wi-Fi network appear in the list of available Wi-Fi networks.
Important! Due to various updates to Raspbian, Tor is no longer launching immediately at startup, as the Wi-Fi interface is not available at this time. To work around this problem the only solution we have found currently is to wait a minute after booting before Tor starts automatically.
We are going to check that our internet traffic now goes through Tor. To do this, it's very simple, connect to your Tor Wi-Fi, and go to the Tor project verification page. If you are logged in correctly, you should have a page that looks like this!

You can now surf in complete anonymity, or almost, with your new anonymous IP address …
Some limitations of a Tor router to keep in mind!
Finally, it is worth noting some limitations of this system, because you should be aware that Tor alone does not guarantee perfect anonymity.
When using a Tor router, you will be using your usual browser to go on the internet. This therefore means that you may already be connected to sites (Facebook, Google account, Twitter, etc.). If you visit one of these sites, or a third-party site making requests to the site you are connected to, this site will be able to match your identity (your account) with your random Tor IP. Goodbye anonymity …

For this reason, always use your browser's incognito mode when you are connected to your Tor Wi-Fi.
Generally speaking, a site can also track you through other techniques, such as JavaScript and the use of complex fingerprints. If you really want to be anonymous, consider using a plugin that turns off JavaScript when browsing.
Also, note that Tor only handles TCP traffic, not UDP traffic, so it will not be encrypted. In addition, Tor is slower than a normal network, since it has to encrypt data and send it around the world.
Another important point is that all of your TCP traffic will go through Tor. If an application is running on your PC, requests made by that application will display your Tor IP. If these requests contain an element allowing you to identify you (a customer id for example), and this application has information on your identity, a person who would have both the logs of the .onion site and the application could cross-check the two Tor IPs with this information to discover your identity.
Finally, note that since Tor does not run directly on your PC, using Tor through a router is potentially susceptible to a "man in the middle" attack on your network.






I did as you said and my Android v7 old LG Aristo connects to .onion sites, but my new OnePlus 7t 5g Maclaren and my wife’s Apple 6 + can’t, altho they spoof the IP address when on the regular web through the Raspi, invoking capchas. The proxy on my Aristo says none, and so does my OnePlus. One works, the other not. My laptop with Linux mint also works through the pi.
Thank you for the tutorial. This business about ports, sockets, and proxies is confusing when you don’t have the bigger picture understood.