How to Setup FTP server on your Raspberry Pi
ⓘ Cet article peut avoir été partiellement ou totalement traduit à l'aide d'outils automatiques. Nous nous excusons des erreurs que cela pourrait engendrer.
You want to transfer files between your Raspberry Pi and your computer remotely without passing by removable media (USB key / external hard drive) and without switching off the Raspberry to transfer directly to its SD card? We will see how to make it easier thanks to an FTP (file transfer protocol) server which as name is indicated allows to transfer files (receive or send) with a remote server.
Installing the FTP server
There are now several FTP server solutions and the one we will choose for this tutorial is most often used namely proftpd . To install it, it’s simple: just run the following command:
sudo apt install proftpd
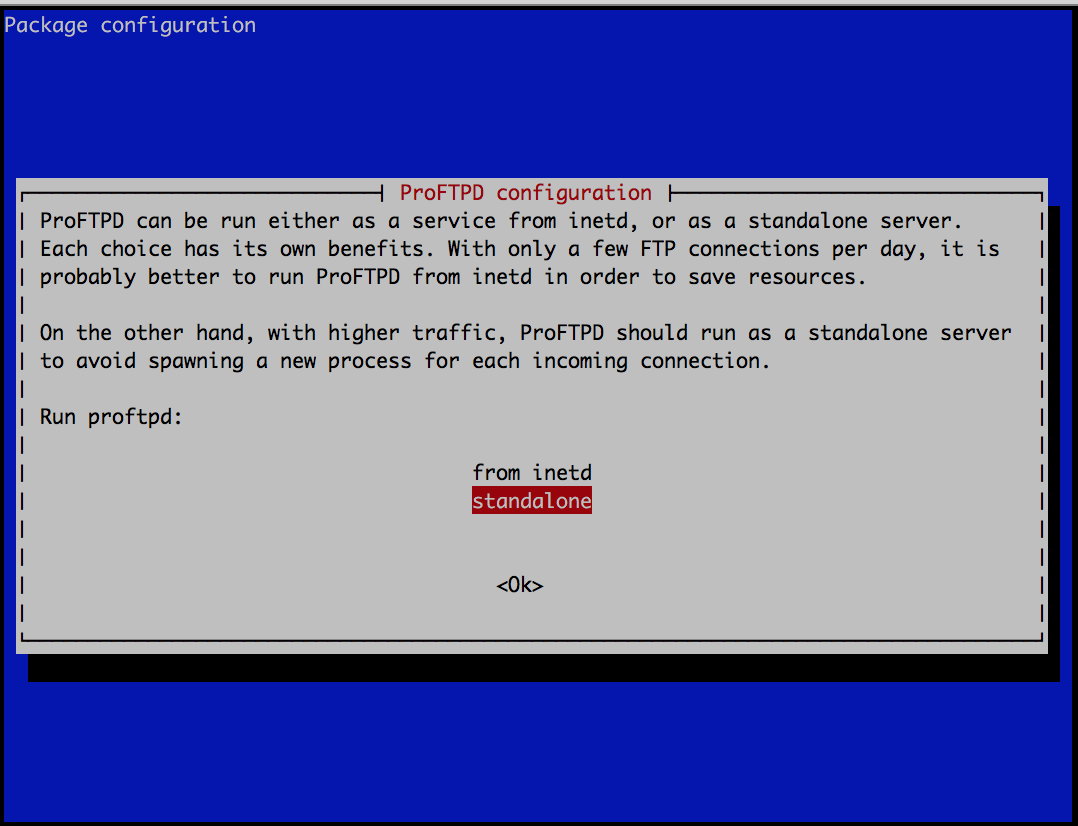
During installation, the window below will appear.

You will be offered a method of using the FTP server:
- from inetd allows you to run the server only when a client tries to connect to it. This slightly slows down the connection to the server but saves resources on the Raspberry Pi
- standalone that will let the FTP server run 24/7 which allows to speed up the connection and which is convenient in case a high number of connection is expected.
Unless you plan to put this FTP server on your Raspberry Pi available to several people who are connected regularly, we advise you to choose the option from inetd.
Your FTP server is installed and you can already connect to it but before showing you how to connect, we will present you the main configurations to perform depending on the utility you will have of your FTP server
Configuring proftpd
Start to open the configuration file with super user rights
sudo nano /etc/proftpd/proftpd.conf
There are a lot of configuration lines. We will consider the one that we consider the most important.
The first line that we consider important is TimeoutIdle, which corresponds to the idle time in seconds after which a user will be automatically disconnected.
Then, you may have multiple users on your Raspberry, and you probably do not want a user to have access to the accounts of others. For that you only need to uncomment the line DefaultRoot by removing the #. This will allow when a user logs in directly to his / her user folder as the config argument indicates with ~ (/ home / ft for example) and it will not be able to return to parent folders.
Finally, if you want your FTP server to be public, you can allow all users to log in without a password. To do this, all the lines in the block between <Anonymous ~ ftp> and </ Anonymous> must be uncommented (by removing all # at the beginning of the lines). To connect, you will still need to use a username, “anonymous” but without a password
After you have finished configuring proftpd, you can enable the changes by running the command:
sudo service proftpd reload
Access your FTP server
Now that your FTP server is installed and configured, all you have to do is connect to it to start the file transfer. For this you can connect directly from your web browser with a type url
ftp://ip-raspberry
for example
ftp://192.168.1.21
Simply enter your Raspberry Pi user ID and password and you will be logged in. This is not very convenient because you will not be able to send a file to the server. We advise you to use an FTP client such as Filezilla.

To log in, fill in the IP of your Raspberry Pi, your user ID and port 21 (default port of the FTP protocol). You can now transfer all your files between your computer and your Raspberry Pi


Your very first command line will fail – you can’t capitalise *sudo*. But I’m not too much of a n00b, so thanks for the info 🙂
Oups, it’s fix, sorry 😉
Where are the files index.html and welcome.msg stored? I would like to modify them, but cannot find them.
Well, i absolutly dont know, you should take a look at proftpd documentation, it have to be mentionned somewhere.