How to create your own media server at home with the Raspberry Pi and OSMC!
ⓘ Cet article peut avoir été partiellement ou totalement traduit à l'aide d'outils automatiques. Nous nous excusons des erreurs que cela pourrait engendrer.
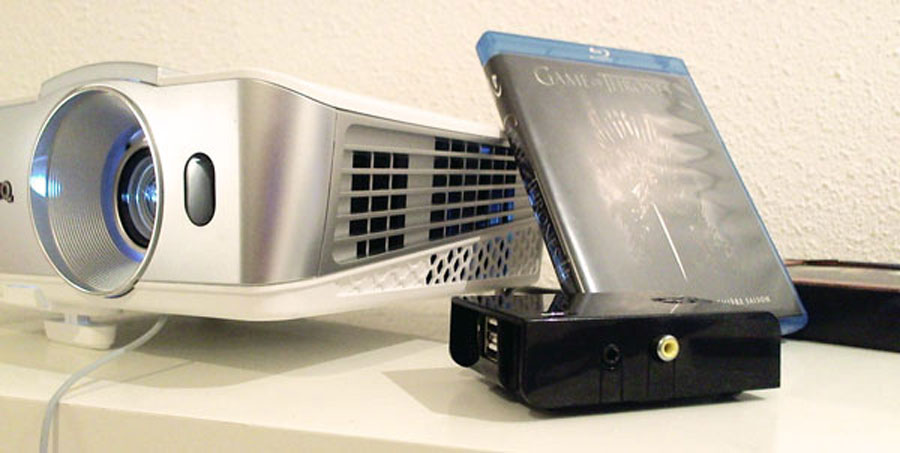
It’s been a long time since we wanted to talk to you about the creation of a media center using the Raspberry Pi, but we did not have one ourselves. However, with the arrival of the Raspberry Pi 3, and for the return of the Game Of Thrones series, we decided to use a Raspberry Pi to make a media center and be able to review the entire series on our video projector Without having wires in all the corners!
So, today we will explain how to install OSMC (the successor of Raspbmc) on your Raspberry Pi to make a media center (from Windows, Linux and even Mac OS X), what OSMC is and the hardware you will need.
OSMC, a mix between Raspbian and the Kodi media center
Before we throw in the water by installing OSMC on our Raspberry Pi, let’s make a little presentation of this system.
Kodi is a free media player dedicated to media centers. It was originally designed for the Xbox but now works on many platforms, including the Raspberry Pi. Kodi is now one of the most used media center solutions!
As a reminder, a media center is a computer used in the context of multimedia use. Most often connected to a TV, it allows you to watch your movies, series, listen to your music, browse the internet, etc.
Kodi is distributed under license GNU / GPL 2, so it is a perfectly free software. It should be noted that Kodi was formerly called “XBMC” and you can sometimes still find this name.
Kodi is a relatively powerful tool, and it supports in particular the addition of plugins in Python allowing to increase very widely its functionalities.
By the way, if you want to use the Raspberry Pi for some complex project, especially domotic and home automation, you should really look for learning some Python, for exemple with this great book about Python and Raspberry Pi.
What is the relationship between Kodi and OSMC?
You may be wondering why we are talking about Kodi in an article allegedly dealing with OSMC. It is because the two are intimately connected.
In fact, OSMC is a distribution based on Raspbian, and adds Kodi (previously XBMC) to Raspbian.
This distribution is therefore one of the easiest to use to mount a media center, since you will not need to install Kodi yourself, everything is already done!
So, now that you know everything about OSMC, let’s look at the hardware we will need to set up our media center.
The required accessories to set up a Raspberry Pi media center
Before starting the installation of the OSMC on your Raspberry Pi, we will begin by going through the accessories you will need to transform your Raspberry Pi into a media center worthy of the name!
You can split the accessories into two categories, those required to operate your Raspberry Pi, and those optional that will simply bring you more comfort. We’ll see them right away.
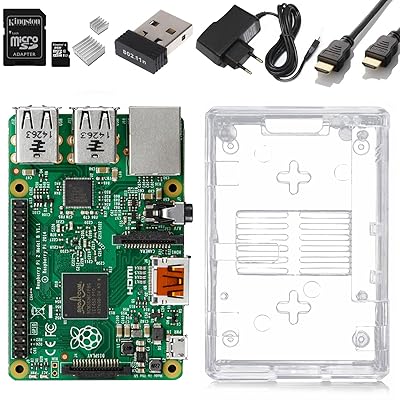
There are kits offering all the necessary accessories to mount a media center with the Raspberry Pi, like this one.
Mandatory hardware to create a media center with Raspberry Pi
At first, you will need a Raspberry Pi, we advise you to take a Raspberry Pi 3 (that you can find here on Amazon), this one is more powerful than the previous models and will offer you a more fluid experience!
You will also need a power supply for your Raspberry Pi, in order to properly power the different ports of the Raspberry Pi 3 (in particular the USB onces). Believe us, when talking about media center, you really want a suitable power supply, that is capable of providing enough power. We are recommending a power supply of at least 5V and 3A, like this one you can found here.
The Raspberry Pi uses a MicroSD card as a hard drive, as part of a media center we advise you to choose a fast card, and a size of at least 16GB. Our advice is to choose a 16GB card like this one, and add an external hard drive to store your movies, music, etc. Be sure to choose an external hard drive with its own power supply, like this one we found as usale on Amazon.
Lastly, you will obviously need a cable to connect your Raspberry Pi to your screen. There are two possibilities:
- You have an HDMI display, and all you need is a simple HDMI cable (you can easily find it on Amazon for about 7$)
- You have a VGA monitor, and you will need a HDMI to VGA converter, with audio output. (You will also find it on Amazon, for approximatively $ 10 for a good quality product like this one).
With this different accessories, you are fully equiped to create a perfectly functional media center with your Raspberry Pi.
Useful but not required accessories to use your media center
As the goal of a media center is to integrate into your home in a harmonious way, you may want your Raspberry Pi being a little more aesthetic. For this purpose, you should use a case for the Raspberry Pi, which will as well protect than beautify your Raspberry Pi. You may find a lot of different cases especially designed for the Raspberry online, but our prefered one, whether for his quality or his awesome designe is definitely this one, sold right here on Amazon.
Last useful point, you may want to use something else than your smartphone to control your media center. For those of you who feel that need, you should take a look in direction of the mini wireless keyboard who also have an integrated trackpad. Thoses make great keyboards for the Raspberry Pi and can be use almost like remote control with your media center.
Be careful, however, to choose a keyboard wich is fully compatible out of the box with Linux. For us, we are using a keyboard from Rii who work very well with Raspbian. You can found this keyboard on that page.
We went through everything you need to know before you start setting up your media center, so we just have to go to the installation.
Install the OSMC media center on your Raspberry Pi
We will now see how to install OSMC on your Raspberry Pi, do not worry, since the transition from Raspbmc to OSMC, the installation is even simpler than before!
Download OSMC
To download OSMC simply go to the OSMC project website and choose the operating system of the computer from which you want to create the SD card.
Once the software is downloaded, insert the microSD card of your Raspberry Pi into your computer, and run the software to begin the installation.
Installing OSMC on the MicroSD Card
At the start of the software you arrive at the following page:
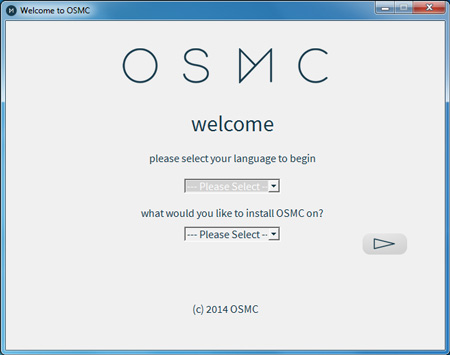
Choose the type of machine on which you want to install OSMC (for us a Raspberry Pi 3)
Select the language of your choice from the first drop-down menu.
The second drop-down menu defines which type of Raspberry Pi you want to install OSMC on. If it is a Raspberry Pi 3 (or model 2), choose “Raspberry Pi 2/3”, otherwise, choose “Raspberry Pi 1 / Zero”. Once done, click Next.
You are now on the version selection page.
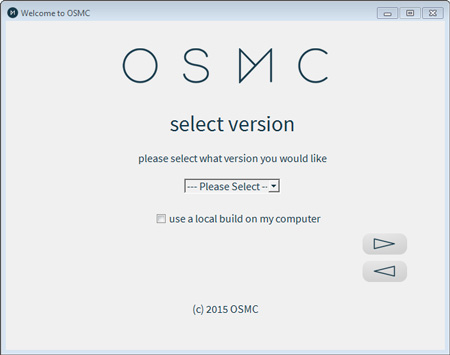
Choose the version of OSMC you want to install
Choose the most current version from the drop-down menu. Make sure the “Use a local build on my computer” check box is cleared, and then click Next.
You arrive on the window of choice of the installation device.
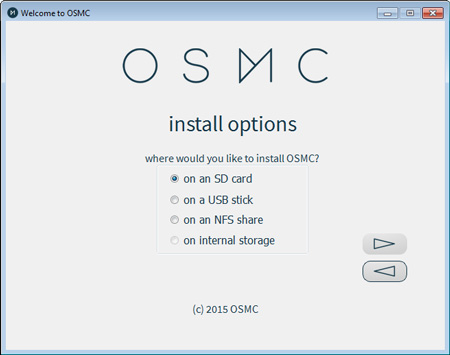
Choose the type of disk on which to install OSMC
Choose SD card installation and go to the next step.
You are now on the step of choosing the type of internet connection, choose the type of internet connection you want your Raspberry Pi media center to use once installed.
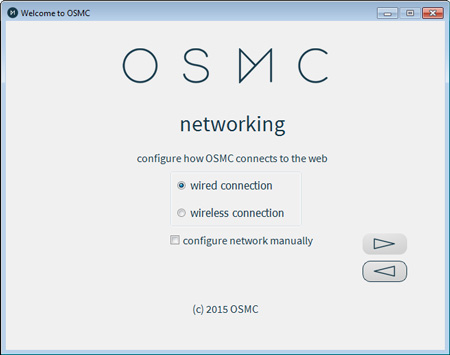
Set the connection type your media center will use when installed
If you chose to use a Wi-Fi connection, the next step will ask you to enter the credentials of the Wi-Fi network to which you want to connect your media-center (this information should be your box configuration).
You are now on the step of choosing the device on which OSMC will be installed.
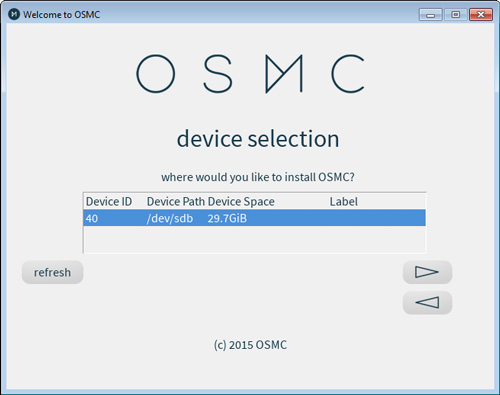
Choose the SD card on which OSMC will be installed
Click on your SD card in the list of available devices, then click Next. Accept the license and go to the next step.
Writing on the card starts. Once it is finished you can eject your MicroSD card, the installation is finished!
Conclusion
OSMC is now installed on your MicroSD card. All you have to do is insert it into your Raspberry Pi and start the Raspberry Pi.
Small additional trick, know that you will be able to find apps for smartphone allowing you to control OSMC with your phone. We will probably do a quick tutorial on the subject in a while.
We hope you will enjoy watching movies with your media center and your Raspberry Pi, here at How To Raspberry Pi, we are ready for the takeover of Game Of Thrones!
PS: For those who would ask, the video projector is a Benq W1070 + (which you can find here on Amazon) and we can only very strongly recommend it, it is definitely an excellent projector, and for a very correct price!
As usual, do not hesitate to take a look at our various tutorials, such as our guide to choose the accessories of your Raspberry Pi 3, our tutorial about the installation of surveillance camera, or our series of tutorials about OSMC.


