Use a domain name with the Raspberry Pi to make it accessible from the internet.
ⓘ Cet article peut avoir été partiellement ou totalement traduit à l'aide d'outils automatiques. Nous nous excusons des erreurs que cela pourrait engendrer.
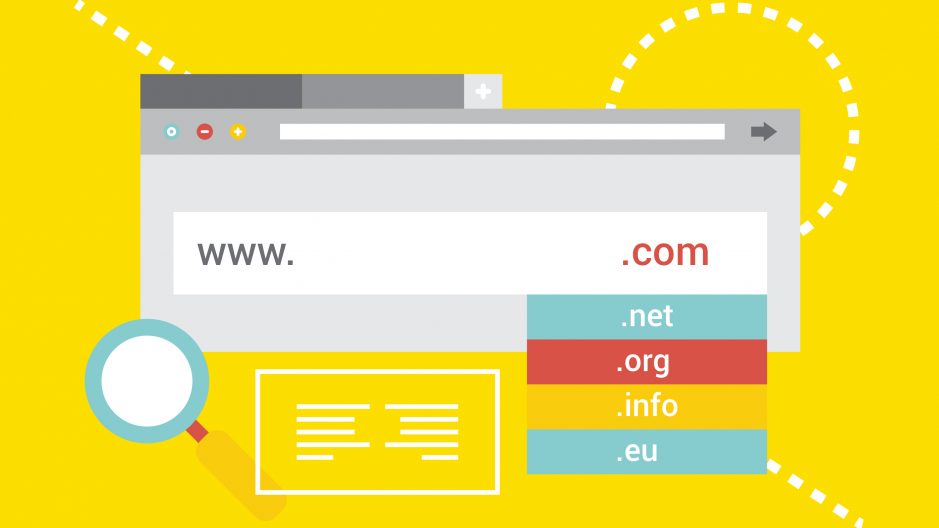
The Raspberry Pi is often recommended for the self-hosting of various and varied services, blogs, emails, servers. But who says web hosting also says domain name!
In this tutorial we will therefore see how to buy a domain name and how to point it to our Raspberry Pi to make it easily accessible from the internet!
What do we need ?
For this tutorial we are going to need a little bit:
- A functional Raspberry Pi connected to the internet with Raspbian installed.
- A budget of a few euros per year to buy a domain name (we'll see how a little later).
Be careful, before going any further, be aware that this tutorial will make your Raspberry Pi accessible from AN
Y internet.If you have left default passwords, unsecured applications, etc., you risk being hacked. Make sure you have taken all the necessary precautions.
What is a domain name and why do we need it?
You know, at Raspberry Pi FR we are not here to give you a simple recipe to follow, but rather to explain how things work. Before getting into the pure and hard technique, let's take a look at what a domain name is and why it is useful to us. If you already know all of this, skip ahead to the next part.
If you know a little about the internet, you know that every machine has what is called an IP address. This IP address is unique and makes it possible to distinguish each machine from the others and therefore to communicate with this single machine.
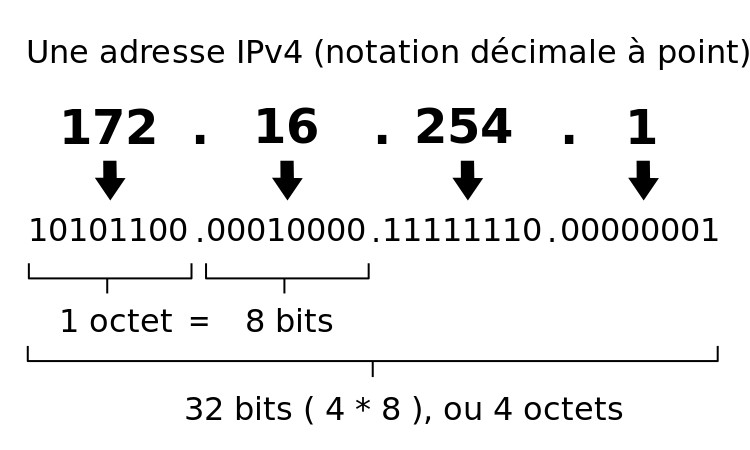
There are also two types of IP, public and local. The first identifies you on the internet, it is that of your box. The second identifies your computer within your local network.
The problem with IP addresses is that they are cipher suites. It's easy to process for computers but it's hard to remember for humans!
The solution that was found is called DNS, for Domain Name System. The goal, to provide a notation readable for humans: the domain name.
In the end, that's a domain name, a readable way for humans to identify an IP address and therefore a machine!
As you can see, if it is technically possible to do without a domain name and only use an IP address, it is really not practical. We will even see a little later that this can be downright impossible in some cases.
Now that we've got the hang of what a domain name is and what it's for, let's see how we can get one!
How to get a domain name for your Raspberry Pi?
This article is not sponsored by any registrar, I am not touching anything to tell you the following!
The first step to be able to use a domain name with your Raspberry Pi, it will logically be to buy a domain name. Because yes, a domain name is not free, it can be sold and it can be bought.
Rest assured, it's really not that expensive. The price of domain names varies mainly according to what is called the extension, that is to say what follows the last . in the name.
There are extensions more or less known, more or less connoted and which inspire more or less confidence. And contrary to what one might think, the best extensions are not necessarily the most expensive!
Overall, for a classic domain name, count 10 € per year maximum.
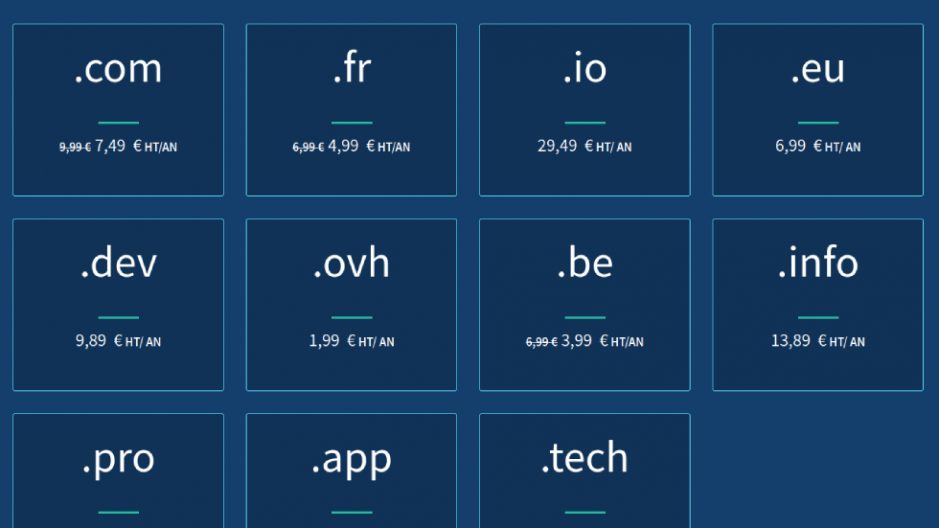
If you are unsure of which extension to choose, keep it simple: .fr, .com, .info or .org.
Now that the price issue is settled, it remains to be seen where to buy our domain name. Well, a domain name is bought from what is called a "registrar", or "Registraire de nom de domaine" in good French.
There are many registrars in France or around the world and the prices are very similar. What will really make the difference is the quality of service and the simplicity of management.
For me there is no comparison, choose OVH. The company is French and will therefore offer you an interface and support in impeccable French, OVH is one of the biggest European or even global players and their management interface is simple.
In addition, for the rest of this tutorial all the steps to be carried out at the registrar will be carried out at OVH, quite simply because it is the one I use on a daily basis, including for this site. Choosing your domain name with OVH will therefore simplify your life.
Buy the domain name.
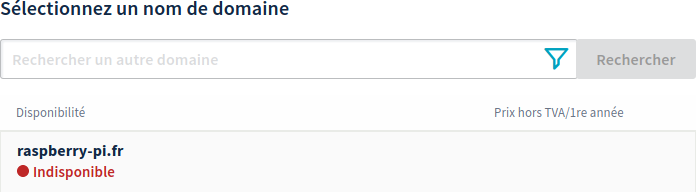
To buy your domain name, go to the site https://www.ovh.com/fr/domaines/ and enter the domain name that interests you in the search form.
You will arrive on a page allowing you to check the availability of the chosen domain name. If it is available, add it to your basket, otherwise you will have to find another name!
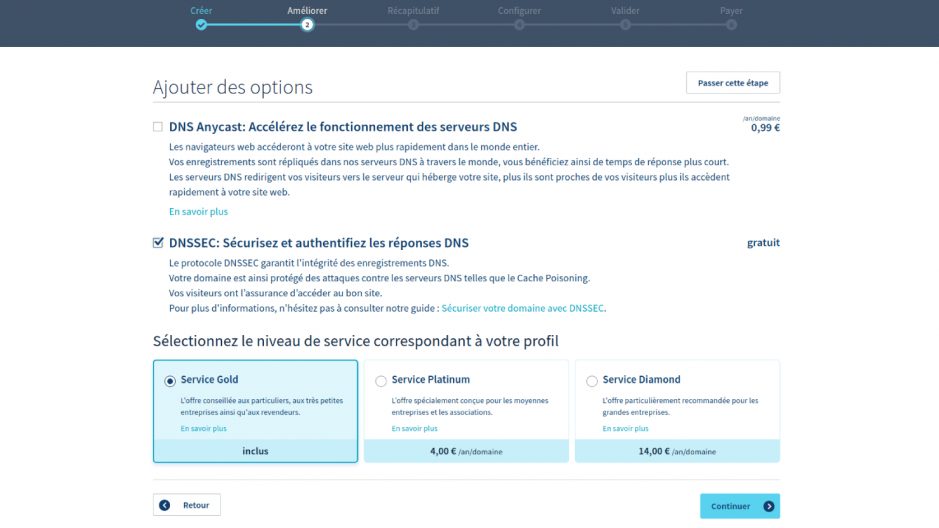
The next page will give you different options for additional offers and the like. Uncheck the "Anycast DNS" box, which would be useless, but check the "DNSSEC" box instead. Choose the level of service already included in the offer and go on.
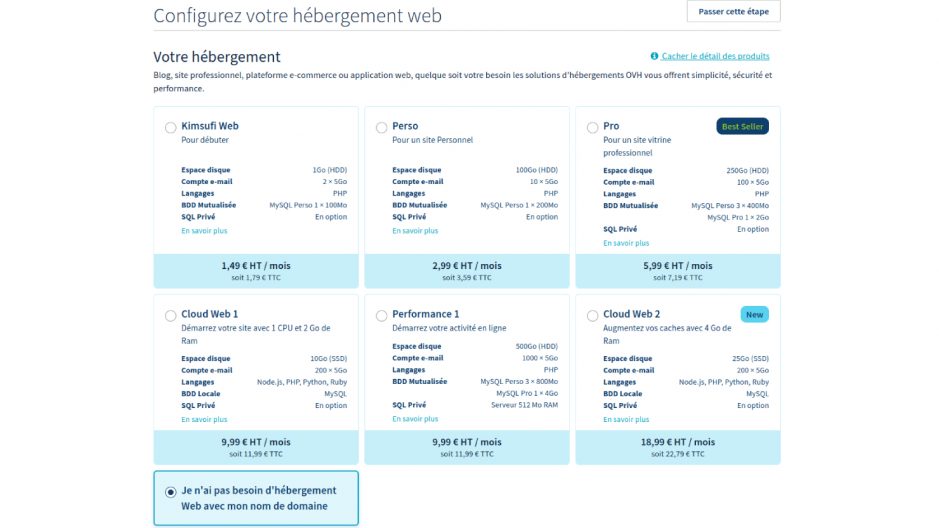
The next page will offer you web hosting to complete your domain name offer. As we will be hosting directly on our Raspberry Pi we are not interested in this, so indicate that you do not need web hosting and go on.
You arrive on the summary page of your order, check that everything is in order and move on. You will now have to log in if you already have an OVH account, or create one.
After your registration you will arrive on the configuration page allowing you to define the contacts for the various operations relating to the domain name (I'll let you put your own), but above all to configure the DNS server to use. Choose to use the "Default DNS Server", which will have the effect of using OVH's DNS servers.
Proceed, validate the contracts and proceed to payment.
Now you have to wait for the domain name to be created, which normally takes a few minutes. You can easily see if the domain name has been created by typing it into your browser and refreshing the page regularly. Once the name is validated you should land on the "Congratulations!" by OVH.
Configure a fixed IP on the Raspberry Pi and make it accessible from the internet.
While waiting for our domain name to be ready, we are going to configure our Raspberry Pi and our box a bit.
As we saw in the explanatory part at the beginning of the tutorial, there are two types of networks and IP addresses, public and private.
Public addresses are accessible from the internet, that is, anyone connected to the internet can send a request to this address, and this address can receive it.
On the other hand, private addresses are only accessible inside the private network (i.e. the internal network of your box and the devices connected to it). Only people inside the private network can send a request to other addresses in the private network.
If we do a diagram, then we get something like this:
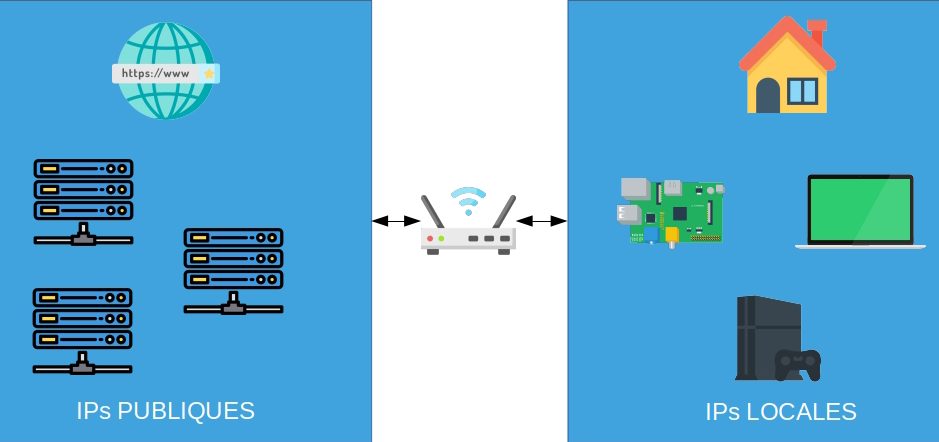
We see that our Raspberry Pi is part of our private network, this means that it is not accessible from the internet.
As our box is the only device with a public IP in our network, it is the only one that can receive requests from the Internet. We will therefore have to configure it so that it retransmits the requests received to the Raspberry Pi.
For that, we will have to do two things, give a fixed IP on the local network to our Raspberry Pi (this will allow the box to know where to find it in the local network), and use what is called port forwarding to transmit the request.
Give a fixed IP to the Raspberry Pi.
For that it's simple, follow our tutorial explaining how to give a fixed local IP to the Raspberry Pi.
Enable port forwarding to the Raspberry Pi.
Now that we have set the IP of our Pi, we will have to configure the port forwarding (or port forwarding for English speakers) to transmit the requests received by our box to our Raspberry.
This way, any request sent over our public IP will be sent directly to our Raspberry Pi.
Go to the administration interface of your box. For that you must go to a particular page with your browser, the page depends on your ISP.
For the 4 large French ISPs, here are the addresses normally used, but if this does not work directly consult the manual of the box which explains how to access the configuration / administration part. Sometimes the address is noted next to the box's network key.
- Orange: http://192.168.1.1
- SFR: http://192.168.0.1/
- Free: https://subscribe.free.fr/login/, connect and go to the "My freebox" section then "Configure my Freebox router".
- Bouygues: http://192.168.1.254
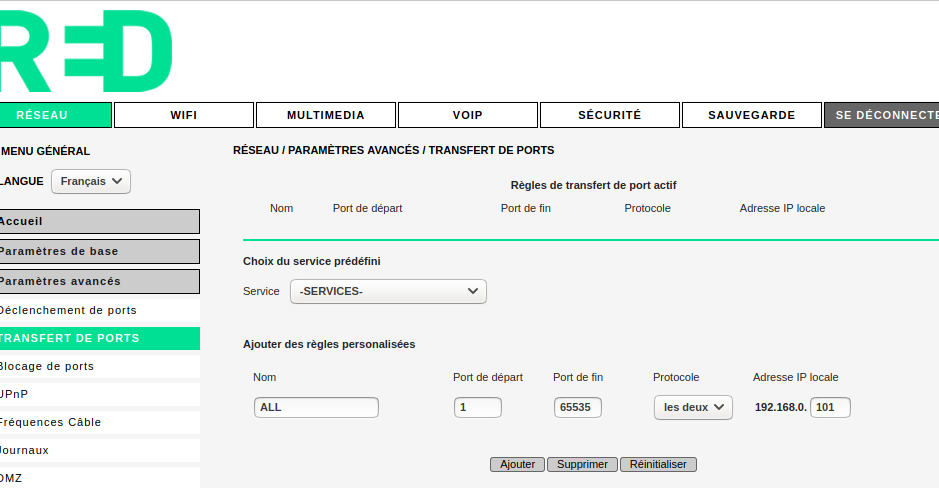
The rest of the procedure depends on each operator because the interfaces vary from one operator to another and from one box model to another. But overall you will always find the following points:
- You must log in as an administrator.
- You must go to the configuration part of your router.
- Usually in advanced settings.
- Then in the port forwarding or port forwarding part.
- Finally, add a new port forwarding, for ports
1at65535, that is to say all the ports, both inTCPand inUDP, to the IP address of your Raspberry Pi that we defined previously.
Here we have opened all the ports for ease of use, ideally you should only open the ports that you want to expose to the outside world, in order to reduce the risk of attacks!
You can verify that it works by trying to connect to your Raspberry in SSH from a device not connected to the network (a 4G phone for example) and by replacing your Pi's IP with your public IP (see here).
And now we just have to match our domain name to our IP!
Point the domain name to the public IP of the Raspberry Pi with DynDNS.
Now that we have a domain name and our Raspberry Pi has a public IP, all we have to do is point the first to the second.
To point a domain name to an IP address, we add a so-called "Type A" record in what is called the "DNS zone" of the domain name, which is a sort of configuration file allowing you to define the behavior of our domain name. On a "normal" server this is what we would have done, but in our case things are a bit more complicated.
Unlike servers rented from a professional, home connections generally have dynamic IPs. To reduce costs and be able to more easily manage their stock of available IPs, access providers often assign a new IP to your box each time it is restarted.
Consequence, if we simply added a field to our DNS A pointing to our current public IP, the next time we restart / change the address of our box, our site would become inaccessible. So we need a way to update the field very regularly A to the current public IP of our box. Good news, for that there is DDNS or DynDNS, for Dynamic DNS.
In our case, we have a domain name at OVH and we have a Raspberry. The easiest for us will therefore be to use the OVH DynDNS service with a script hosted on the pi. You will see, it is not very complicated!
Configure the OVH DynDNS.
To start, connect to your OVH profile and go to the manager's web part, in the left column click on "Domains", then on your domain name to get to the management page.
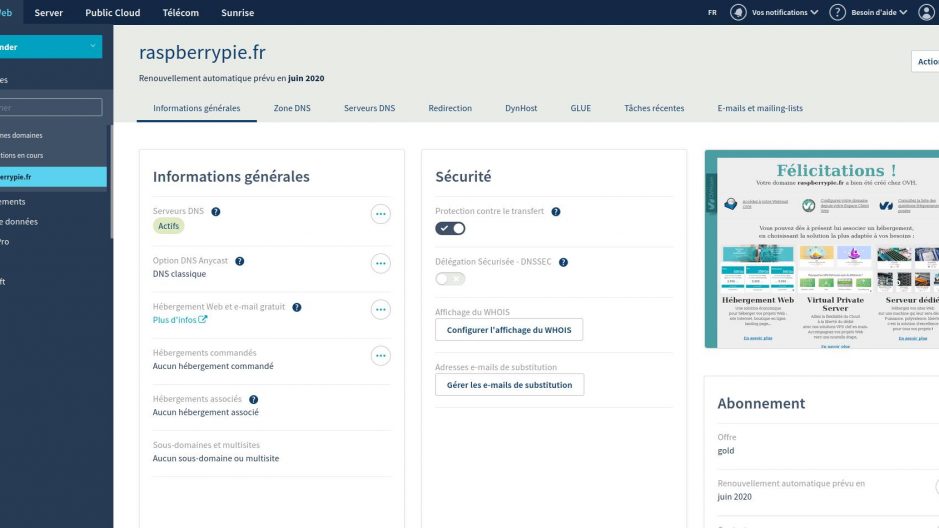
Now go to the "DNS Zone" tab, look for a record of type A, and delete it.
Then, go to the DynHost tab, and click on "Manage access" then on "Create an identifier". You will have a form with 4 fields to fill in:
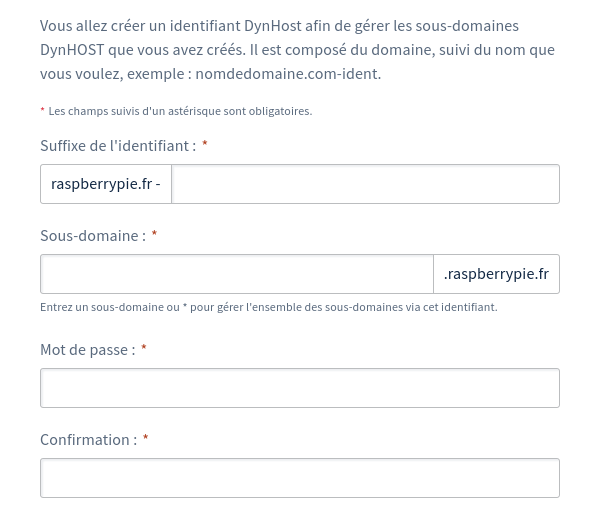
- Username Suffix: Enter whatever you want.
- Subdomain: Enter
*, which will validate all possible subdomains, including the absence of a subdomain. - Password & Confirmation: Choose a strong password, it will be used by the script to authorize the modification of the IP.
Once the identifier has been created, click on the back button and on "Add a DynHost". This time you will have to fill in two fields:
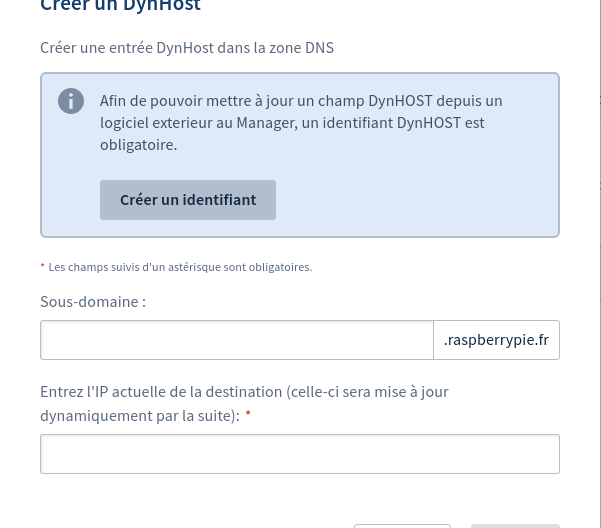
- Subdomain: Leave blank to use the global domain name. If you wish to use a subdomain you can fill it with the subpart of your choice.
- Current IP: Enter your current public IP, you can find it here.
Now that we have configured the DynHost on OVH, we will be able to create the script that will be used by the Raspberry Pi to update the IP.
Configure the Raspberry Pi to use the DynHost OVH.
There are several ways to update a DynDNS. In our case we will create a script that will be executed every 5 minutes, will retrieve our public IP and send a request to OVH to update the IP of the domain name.
For this on our Raspberry we will start by downloading the script dyndns.sh in the file /usr/local/sbin and give it the necessary rights so that it is readable and executable only by the administrator:
sudo wget https://raw.githubusercontent.com/RaspbianFrance/dyndnsovh/master/dyndns.sh -O /usr/local/sbin/dyndns.sh
sudo chmod 700 /usr/local/sbin/dyndns.sh
We are now going to modify the script to fill in our own settings. To do this, open the script as root with nano by running the following command:
sudo nano /usr/local/sbin/dyndns.shIn the file, look for the following lines:
DYNHOST_ID=''
DYNHOST_PASSWORD=''
DOMAIN_NAME=''
And for each of these lines, enter between the ' the following information :
- DYNHOST_ID: The DynHost identifier that you created at OVH (this is the string in the format
votrenomdedomaine.fr-xxxx). - DYNHOST_PASSWORD: The password that you set for the DynHost ID.
- DOMAIN_NAME: Your domain name (with its subdomain if ever you have defined a subdomain rather than using the global domain).
Save the changes and verify that the script is working fine by running the command below:
sudo /usr/local/sbin/dyndns.shYou should have a return that looks like nochg 91.130.39.102 or good 91.130.39.102, with your public IP instead. These two returns indicate an already updated IP or a successful update.
Now all we have to do is make sure that the script starts up every 5 minutes. Nothing could be simpler for this, we will use the crontab, software that runs in the background on Linux and can run other scripts on a regular basis.
To do this, run the command:
sudo crontab -eIf this is your first time running it, you may need to choose a text editor to use, pick the one that suits you (default nano).
Go to the end of the file and add on a new line:
*/5 * * * * /usr/local/sbin/dyndns.sh > /dev/null 2>&1Save the changes, and voila, the IP address your domain name points to will be updated every 5 minutes.
Conclusion
Wait a few minutes and go to the DynHost part of your domain name at OVH. You should see that the IP associated with the domain matches yours. If you manage to change the IP of your box (for example by restarting it, it depends on the ISPs), you should see it update after 5 minutes.
You can also check that everything is working correctly by trying to access your pi, for example in SSH, using your domain name instead of your IP.
You now have a Raspberry Pi accessible on the internet via its domain name!


