Activate the TTL serial port of the Raspberry Pi and verify that it is working.
ⓘ Cet article peut avoir été partiellement ou totalement traduit à l'aide d'outils automatiques. Nous nous excusons des erreurs que cela pourrait engendrer.
If you get into electronics with the Raspberry Pi you will quickly need to use the serial port to allow your Pi to communicate with an external module. But to be able to use the serial port, you will first need to activate it on the Raspberry Pi.
In this tutorial we will therefore see how to activate the serial port of the Raspberry Pi and check that it is working properly.
For this you will need the following materials:
- A Raspberry Pi with raspbian.
- Dupont cables and resistors.
What is the serial port for?
As its name suggests, the serial port communicates data "serially", ie one bit after the other. This is what makes its use and implementation quite simple from a software and electronic point of view, allowing the creation of very inexpensive interfaces.
If today it is largely unknown to the general public, replaced by USB (which is itself a serial port), it remains widely used in electronics to allow different electronic modules to communicate.
As part of the Raspberry Pi, you will therefore potentially have to use the serial port to use external probes or modules requiring data exchange with the Raspberry.
Activate the Raspberry serial port to communicate with an external module.
By default, the Raspberry Pi serial port is connected to the console to allow control of the Raspberry Pi without a graphical interface. If this can be useful to connect to the Raspberry without internet, it is however incompatible with standard use of the serial port.
To begin with, we will therefore have to modify the configuration of the Raspberry to use the serial port as a "serial interface" rather than a console.
To do this, open a terminal on your Raspberry Pi, either directly or via SSH, then run the command sudo raspi-config to access the Raspberry configuration management tool.
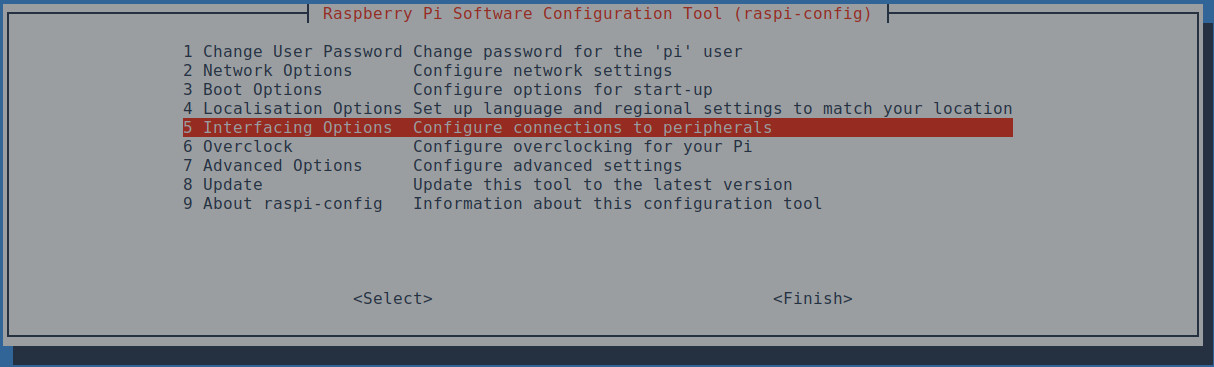
Once raspi-config started, choose Interfacing options, then Serial. Answer No to the part asking if you want to activate a shell via the serial connection, then Yes to the part asking if you want to activate the hardware port. Validate, do Finish, then say yes to the question asking if you want to reboot the Raspberry Pi.
Additional steps to activate the serial port of Raspberry Pi 3, 4 and more.
This part is specific to models 3 and later.
Internally reading serial data uses what is called a UART. All Raspberry models have at least 2 UARTs, number 0, which is a normal UART and number 1, which is a mini UART with much more limited and very restrictive capacities.
Historically UART 0 was used by default, but since the switch to version 3 this is no longer the case, it is now used to manage the bluetooth chip. If you are using a Raspberry Pi 3 or a later model, you will therefore have to modify this behavior and deactivate bluetooth.
To do this, run the commands below:
echo "dtoverlay=disable-bt" | sudo tee -a /boot/config.txt
sudo systemctl disable hciuart
sudo reboot
Check that the Raspberry serial port has been activated.
Now that our port is activated, we just have to check that everything is working as expected.
Technically, the Raspberry serial port is in the form of two GPIOs, one for receiving data, RXD, and one for sending TXD.
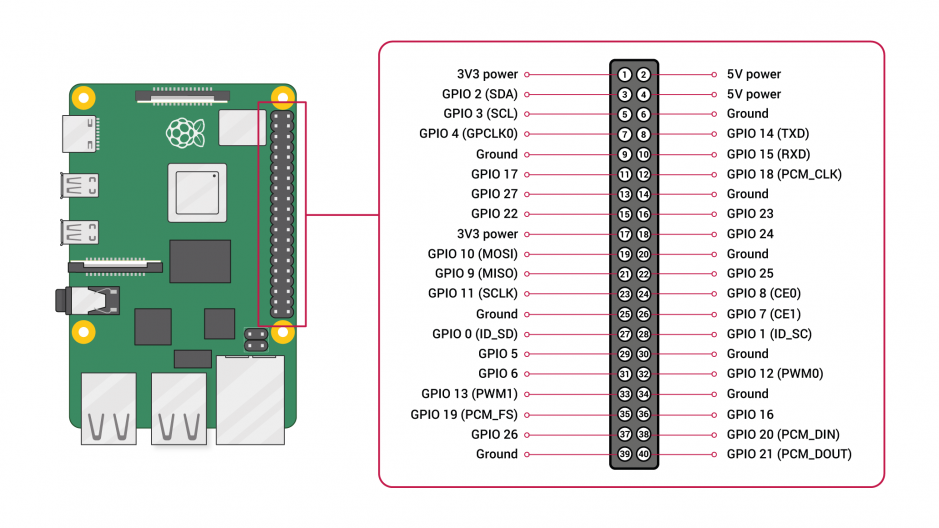
To verify that our port is working as expected, we will simply link the RXD and TXD ports together. This way, any data sent to the TXD port will be received by the RXD port, and we can read them on the screen.
Be careful, when you use a real external module, the principle will be the same, namely connect the TXD of the module to the RST of the Pi and the RST of the Pi to the TXD of the module.
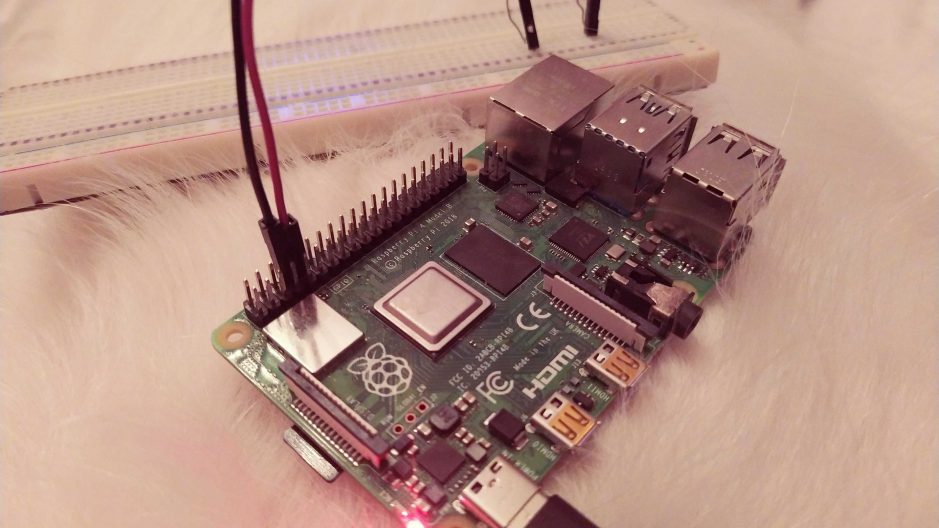
Connect the serial ports.
To connect the serial ports between them, we will use a breadboard of the dupont cables, and a resistor. Technically resistance is not absolutely necessary, but in case of handling error it will protect your raspberry.
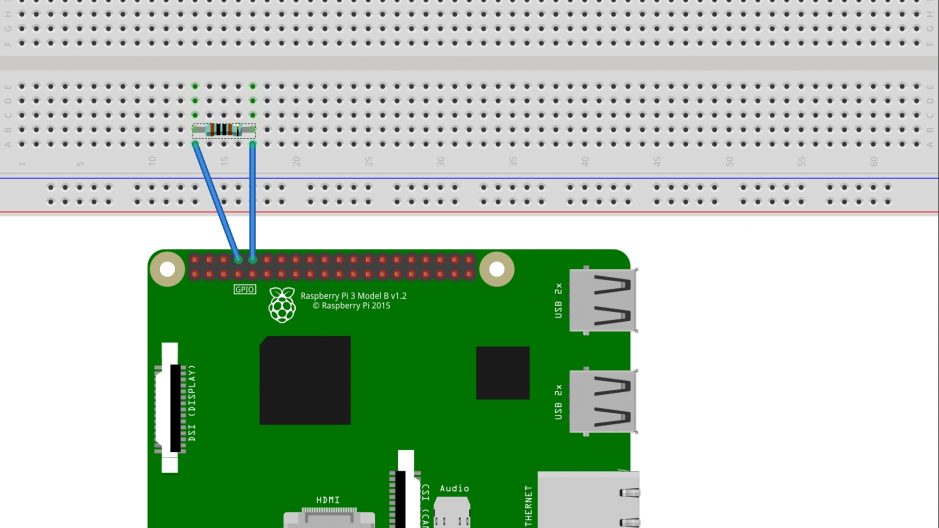
The choice of resistance does not matter much, you will easily find 1000 ohms which will do very well, but 470 ohms is more than enough.
Note when you connect a real module, remember to check that its TXD uses 3.3 V, like the Raspberry. If you need to plug in a module that sends its data at 5 V, you will need to use a divider bridge.
Check that everything works with Minicom.
Now that everything is wired, all that remains is to test using a program allowing serial communication, Minicom.
To begin with, no, let's install Minicom with the commands below.
sudo apt update -y
sudo apt install minicom -y
Once the installation is complete, all we have to do is start Minicom by indicating the serial port to use.
Serial ports are all accessible as devices in Linux, so in the folder /dev and are named serialX, or X is the serial port number. In our case we want to use serial port 0, so we will use /dev/serial0.
We can therefore launch Minicom with the following command:
sudo minicom -D /dev/serial0A Minicom terminal starts up, if you type a letter, it should appear on the screen!
There you have it, your serial port is functional, you just have to use it!


