
Use an RFID reader with the Raspberry Pi.
ⓘ Cet article peut avoir été partiellement ou totalement traduit à l'aide d'outils automatiques. Nous nous excusons des erreurs que cela pourrait engendrer.
This tutorial is the second part of a file devoted to discovering electronics with the Raspberry Pi. If you haven't read it, I advise you to consult the first tutorial to control an LED with the Raspberry Pi.
Whether for identification systems, inventory management, payment, or for home automation, RFID chips are used more and more.
In this tutorial we will see how to read RFID cards with the Raspberry Pi and an RC522 RFID reader.
At the end of the tutorial, you will be able to read an RFID badge, check if it is the one expected, and light up a green or red LED, depending on the result. All you have to do is adapt this basic example for the project of your choice!
The necessary equipment
To complete this tutorial, you will need the following materials:
- A Raspberry Pi
- His diet
- MicroSD card
- An RC522 RFID reader
- A set of cables, LEDs, resistors and test plates
- A soldering iron and solder
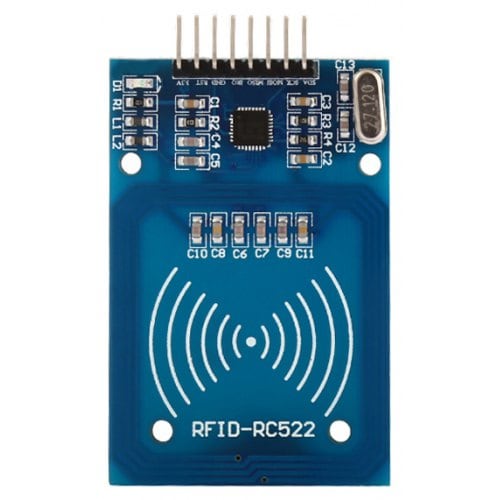
Assemble the RC522 RFID reader
When you receive the RC522 RFID module, you can see that it comes with a set of 2 x 8 pins. The first step will therefore be to solder 8 of these pins on the RFID reader. Don't panic, soldering is very easy!
You must therefore insert the PINs into the slots provided on the RFID card and solder them with your iron.
If you have never welded, I recommend this excellent guide to learn how to weld from François from framboise314.fr.
Connect the RFID reader and the LEDs to the Raspberry Pi
Before moving on to writing the code that will allow us to read RFID badges and control the LEDs, we must first connect all the components to the Raspberry Pi.
As a reminder, plugging and unplugging components must always be done with the Raspberry Pi turned off.
Connect the RC522 RFID reader to the Raspberry Pi
The first component we are going to plug in is the RFID reader.
To control the RFID reader we will use an external library. Unfortunately, this is written with the GPIOs ports directly entered in the code. This means that we cannot configure them differently and that we are therefore forced to use exactly the same ports as those provided in the library.
Here is a table listing the reader ports and the GPIO port of the Raspberry Pi to which you will need to connect it.

As a reminder, you will find a map of the GPIO ports of the Raspberry Pi in the first tutorial in this series.
Connect the LEDs
After the RFID reader, let's connect the LEDs to the Raspberry Pi.
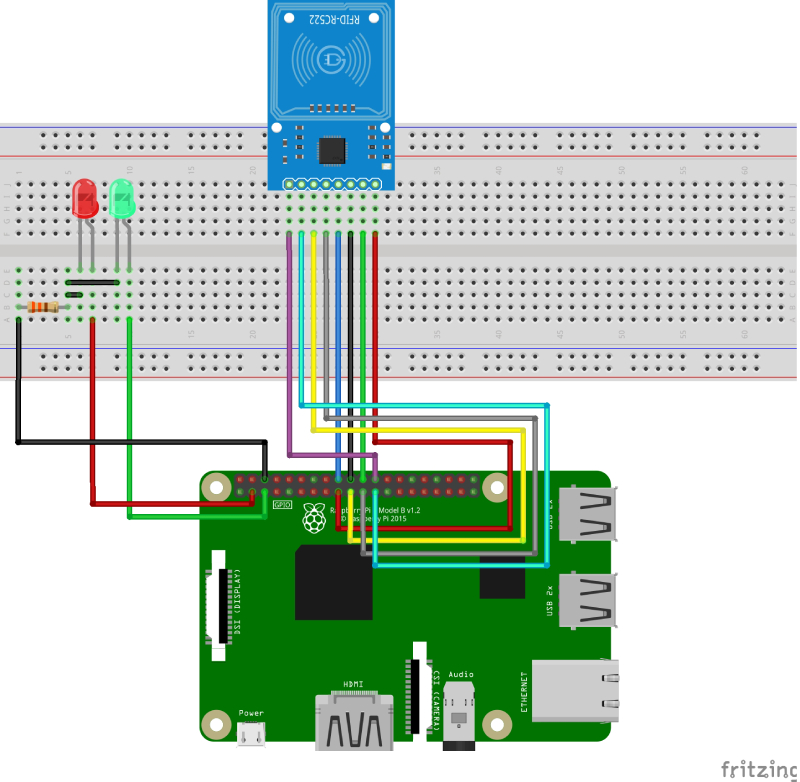
We are going to make a very simple assembly. Each LED will have its anode (the elongated leg) connected to a GPIO port and the two LEDs will have their anode connected to the same resistor, itself connected to a GPIO Ground type port of the Raspberry Pi.
Thus, we use a single resistor for two LEDs, and we limit the number of cables.
In the end, once the RFID card and the LEDs are connected to the Pi, you should have an assembly resembling this one.
Write the program to read an RFID badge.
We have a functional circuit, we just have to activate the SPI ports of the Raspberry Pi, necessary to use the RFID reader, and write the program that will read an RFID badge.
As in the previous tutorial, the program will be written in Python. This tutorial is not a Python course, and we will only briefly explain the program. If you want to learn more about Python, we have published an Introductory Programming with Python course.
Activate the SPI protocol of the Raspberry Pi
Before writing the program, let's enable the SPI protocol on our Raspberry Pi so that we can use the RFID module.
To activate it, simply run the command sudo raspi-config, on your Raspberry, then choose Interfacing Options, SPI, Yes and finally Finish.
Install the pi-rc522 library
Last prerequisite, we are going to install the Python3 "pi-rc522" library which allows you to control the RC522 player.
We will be using Pip3, a library manager for Python.
You just need to run the command:
sudo pip3 install pi-rc522
Write the program to read the identifier of an RFID badge
Each RFID badge has a unique identifier. It is by reading this identifier and comparing it to a list of authorized identifiers that we can know if a badge is authorized.
We are therefore going to write a program allowing us to read the unique identifier of an RFID badge.
As we did in the previous tutorial, we will write the program in the folder /home/pi/electronic (if you haven't already, create the folder).
In this folder, create a file read_rfid_uid.py and put the following code in it:
#!/usr/bin/env python3.5
#-- coding: utf-8 --

import RPi.GPIO as GPIO #Importe la bibliothèque pour contrôler les GPIOs
from pirc522 import RFID
import time


GPIO.setmode(GPIO.BOARD) #Définit le mode de numérotation (Board)
GPIO.setwarnings(False) #On désactive les messages d'alerte

rc522 = RFID() #On instancie la lib

print('En attente d'un badge (pour quitter, Ctrl + c): ') #On affiche un message demandant à l'utilisateur de passer son badge

#On va faire une boucle infinie pour lire en boucle
while True :
    rc522.wait_for_tag() #On attnd qu'une puce RFID passe à portée
    (error, tag_type) = rc522.request() #Quand une puce a été lue, on récupère ses infos

    if not error : #Si on a pas d'erreur
        (error, uid) = rc522.anticoll() #On nettoie les possibles collisions, ça arrive si plusieurs cartes passent en même temps

        if not error : #Si on a réussi à nettoyer
            print('Vous avez passé le badge avec l'id : {}'.format(uid)) #On affiche l'identifiant unique du badge RFID
            time.sleep(1) #On attend 1 seconde pour ne pas lire le tag des centaines de fois en quelques milli-secondes
Once the file has been saved, it is authorized for execution with the command:
sudo chmod +x /home/pi/electronic/read_rfid_uid.py
We can now start the program by calling it with the command:
/home/pi/electronic/read_rfid_uid.py
Each time you pass an RFID badge in front of the reader, its unique identifier will be displayed!
Write a program that displays whether a badge is valid or not.
Now that we can read the unique identifier of a badge, all we have to do is adapt the previous code to compare the identifier read to an identifier written in the program.
We are therefore going to modify the previous program a little so that it compares the uid read with the one written in the program, and light the red or green led depending on the result.
Copy the previous file to a new file verify_rfid.py and modify it for the code below:
Edit the line RFID_UID to put the identifier of your RFID tag!
#!/usr/bin/env python3.5
#-- coding: utf-8 --

import RPi.GPIO as GPIO #Importe la bibliothèque pour contrôler les GPIOs
from pirc522 import RFID
import time


GPIO.setmode(GPIO.BOARD) #Définit le mode de numérotation (Board)
GPIO.setwarnings(False) #On désactive les messages d'alerte

LED_RED = 3 #Définit le numéro du port GPIO qui alimente la led rouge
LED_GREEN = 5 #Définit le numéro du port GPIO qui alimente la led verte
RFID_UID = [21, 35, 5, 43, 57] #Définit l'UID du badge RFID

#Définit la fonction permettant d'allumer une led
def turn_led_on (led) :
    GPIO.setup(led, GPIO.OUT) #Active le contrôle du GPIO
    GPIO.output(led, GPIO.HIGH) #Allume la led

#Définit la fonction permettant d'éteindre une led
def turn_led_off (led) :
    GPIO.setup(led, GPIO.OUT) #Active le contrôle du GPIO
    GPIO.output(led, GPIO.LOW) #Eteind la led

#Définit la fonction permettant d'allumer la rouge et éteindre la verte
def turn_red_on () :
    turn_led_off(LED_GREEN) #Eteind la led verte
    turn_led_on(LED_RED) #Allume la led rouge

#Définit la fonction permettant d'allumer la verte et éteindre la rouge
def turn_green_on () :
    turn_led_off(LED_RED) #Eteind la led rouge
    turn_led_on(LED_GREEN) #Allume la led verte


rc522 = RFID() #On instancie la lib

print('En attente d'un badge (pour quitter, Ctrl + c): ') #On affiche un message demandant à l'utilisateur de passer son badge

#On va faire une boucle infinie pour lire en boucle
while True :
    rc522.wait_for_tag() #On attnd qu'une puce RFID passe à portée
    (error, tag_type) = rc522.request() #Quand une puce a été lue, on récupère ses infos

    if not error : #Si on a pas d'erreur
        (error, uid) = rc522.anticoll() #On nettoie les possibles collisions, ça arrive si plusieurs cartes passent en même temps

        if not error : #Si on a réussi à nettoyer
            if RFID_UID == uid :
                print('Badge {} autorisé !'.format(uid))
                turn_green_on()
            else :
                print('Badge {} interdit !'.format(uid))
                turn_red_on()

            time.sleep(1) #On attend 1 seconde pour ne pas lire le tag des centaines de fois en quelques milli-secondes
All you have to do is launch the program and test!
You can then adapt the code for your own projects, such as creating a smart lock, or even a jukebox using RFID tags!
For information, you can get all the code for this tutorial on the Github of Raspbian France.
In the next tutorial, we will see how to control a servo motor with the Raspberry Pi!


