How to control a servo motor with the Raspberry Pi
ⓘ Cet article peut avoir été partiellement ou totalement traduit à l'aide d'outils automatiques. Nous nous excusons des erreurs que cela pourrait engendrer.
This tutorial is the third part of a file devoted to discovering electronics with the Raspberry Pi. If you have not read it, I advise you to consult the first tutorial to control an LED with the Raspberry Pi as well as the second tutorial to use an RFID reader with the Raspberry Pi.
When starting home automation, a classic need is to control physical movement in reality from a program.
In this tutorial we will see how to use the Raspberry Pi to control a servo motor.
Accessories for controlling a servomotor
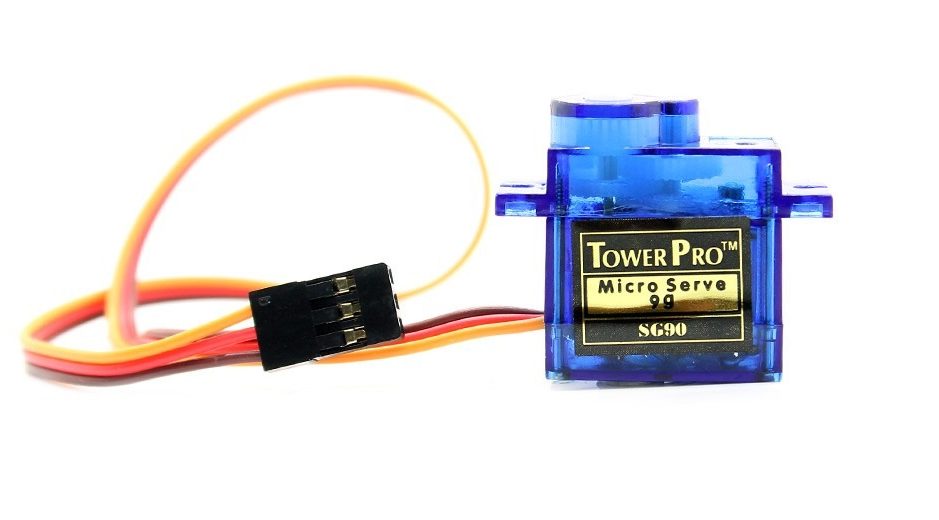
To be able to follow this tutorial and control a servomotor we will need the following material:
What is the difference between motor, servo motor and stepper motor?
Before starting to connect our servomotor to our Raspberry Pi, let's take a look at the different types of motors conventionally used in electronics.
Without going into details, we can roughly divide the motors used in electronics into three categories:
- The motor: It runs as long as it is powered. It is suitable when you want to perform a continuous movement that does not require great precision.
- The stepper motor: It turns in a sort of small successive leaps. That is to say that you will be able to ask him to do, for example, 50 jumps, or 112 jumps, which will correspond to a certain movement (for example a quarter of a turn). It is suitable when you want to make a continuous movement with high precision (they are for example used in 3D printers).
- The servomotor: It turns at a certain angle, defined according to a PWM (Pulse Width Modulation) type signal. Often small motors are limited and cannot do more than one revolution. They are therefore rather used for a short movement of great precision.

There would still be a lot of other things to say about these different engines, but we will then get into mechanical questions that go far beyond the scope of our tutorial.
In our case we are going to use a servo motor because it is the easiest precision motor to control from a Raspberry Pi.
Connect a servo motor to the Raspberry Pi
The first thing to do to be able to use our servo motor is to plug it into the Raspberry Pi.
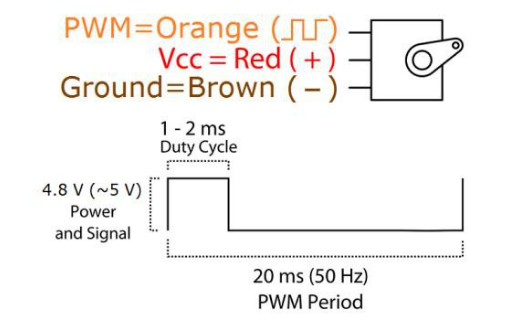
The actuators have 3 electrical connectors. Colors can change depending on the manufacturer, but generally you will find something like:
- A red wire, which serves as a power supply.
- A black or brown wire, which serves as GDN.
- Another wire, which is used to transmit the PWM signal controlling the position of the motor.
We will therefore connect these different cables to the Raspberry Pi, the red wire to a 5-volt GPIO port and the black to a GND port.
For the PWM port on the other hand, we will necessarily have to connect it to the 12th GPIO pin of the Raspberry Pi. Indeed, it is the only GPIO pin supporting a PWM signal by default.
So you should have a montage like this.
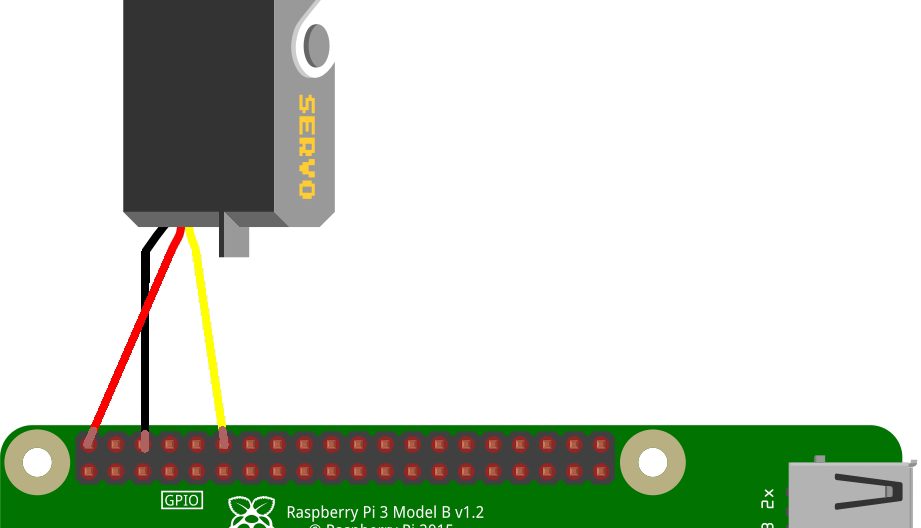
Note, here we are powering our servo motor directly from the Raspberry Pi. This works because we are using a very small servo motor, but on a larger model we would need a dedicated power supply.
Control the servomotor in the command lines
Now that we have connected our servomotor, we will be able to drive it directly from the Raspberry Pi command line.
To do this, we will start by activating the PWM mode on port 12, i.e. GPIO 18 according to the processor numbering.
gpio -o mode 18 pwm
And we will activate the Mark / Space mode of PWM, which allows to have a signal more suited to our use.
gpio pwm-ms
Finally, we will configure the duration of a cycle, the frequencies to use, etc.
The servomotor is set to operate at a frequency of 50 Hz, i.e. 20 ms. The Raspberry Pi signal works at another frequency, 19.2 MHz. Using these two figures, we can calculate a period and a range (thanks to ramboise314.fr for the formula):
50 = 19.2 * 10^6 / 192 / 2000
We will therefore set the Raspberry Pi to use these values:
gpio pwmc 192
gpio pwmr 2000
Finally, we will be able to get our engine moving! Note that we do not pass an angle to the servomotor, but a number that will be converted into an angle. Our servo motor goes from 0 ° to 180 °. After some testing, it would seem that 0 ° corresponds to 230, 90 ° to 150 and 180 ° to 70.
To send our motor at 90 ° we will therefore use the command:
gpio -g pwm 18 150
And we will replace 150 by 230 to go to 0 °, 70 to go to 180 ° or any value in between as we need.
Note, these small motors support an angle of 180 ° in a precise way, but they have a little margin which can cause them to make 190 ° or 200 ° and even to make a full turn if you put a sufficiently low value. It is specific to each engine model.
Drive the servomotor with Python
As with the previous tutorials in this series, the goal is rather to control our engine with Python rather than directly from the command lines. I consider that you now have the basics of Python, if not go read the previous tutorials, links are available at the beginning of this article.
To control our engine from a Python script we will once again use the lib Rpi.GPIO.
In Python and on the Pi, the motor angle is calculated as a percentage of the cycle. This percentage is called "Duty Cycle".
A 0.5ms signal corresponds to 0 ° and a 2.5ms signal to 180 °. Knowing that our cycle is 50 Hz, i.e. 20ms, this allows us to calculate the Duty Cycle for 0 ° and 180 ° like this:
x = 0.5 / 20
y = 2.5 / 20
We then find that the Duty Cycle corresponding to 0 ° is 0.025, or 2.5% and that the one corresponding to 180 ° is 0.125, or 12.5%.
Small problem however, if this value is theoretically good, in fact it tends to trigger a full revolution of the motor for 0 ° … I therefore recommend that you use 4% for 0 °. The value 12.5% for 180 is good.
To control the motor, we just need to set pin 12 as our PWM signal, and use the functions start and ChangeDutyCycle.
You can therefore create a file servo.py and put the following code there:
#!/usr/bin/env python3
#-- coding: utf-8 --
import RPi.GPIO as GPIO
import time


#Set function to calculate percent from angle
def angle_to_percent (angle) :
    if angle > 180 or angle < 0 :
        return False

    start = 4
    end = 12.5
    ratio = (end - start)/180 #Calcul ratio from angle to percent

    angle_as_percent = angle * ratio

    return start + angle_as_percent


GPIO.setmode(GPIO.BOARD) #Use Board numerotation mode
GPIO.setwarnings(False) #Disable warnings

#Use pin 12 for PWM signal
pwm_gpio = 12
frequence = 50
GPIO.setup(pwm_gpio, GPIO.OUT)
pwm = GPIO.PWM(pwm_gpio, frequence)

#Init at 0°
pwm.start(angle_to_percent(0))
time.sleep(1)

#Go at 90°
pwm.ChangeDutyCycle(angle_to_percent(90))
time.sleep(1)

#Finish at 180°
pwm.ChangeDutyCycle(angle_to_percent(180))
time.sleep(1)

#Close GPIO & cleanup
pwm.stop()
GPIO.cleanup()
All you have to do is run the script by doing:
python3 ./servo.pyYou should then see your engine start at 0 °, then shift to 90 ° and finally stop at 180 °.
All you have to do is adapt this script to your own needs!


