Transfer files to the Raspberry Pi without FTP with SSH.
ⓘ Cet article peut avoir été partiellement ou totalement traduit à l'aide d'outils automatiques. Nous nous excusons des erreurs que cela pourrait engendrer.
I'm sure you've needed to transfer files from your PC to your Raspberry Pi over the network before. If so, chances are you had to install an FTP server. And yet there was a much easier way …
In this tutorial we will see how to transfer files from our computer to our Raspberry Pi without having to install an FTP server, but only by using the SSH server already installed on the Raspberry Pi and the command scp !
The material used in this tutorial
In this tutorial we will use the following material:
- A Raspberry Pi connected to the network
- His diet
- Its SD card
- A second PC on the network, running Linux, Windows or Mac.
In addition, to complete this tutorial you will also need to have enabled the SSH server of your Raspberry Pi. If you don't know how, check out our tutorial to enable SSH.
What is SCP transferring files using SSH?
If you're using the Raspberry Pi you've probably heard of SSH, a tool that lets you take control of a computer remotely from the command lines. But what you might not know is that SSH isn't just for that.
One of the many possible uses for SSH is SCP, for Secure CoPy. This is a protocol for transferring files from one computer to another, relying on the SSH protocol which will encrypt the transferred data.
For us who work with the Raspberry Pi, SCP is therefore particularly interesting, since the Raspberry Pi already has an integrated SSH server and therefore we will not have to install or configure a server, as is the case with FTP.
If you're new to SSH at all, you might want to read our SSH tutorial before continuing. It's not essential, but I think it makes things clearer.
Transfer files with SCP from a Linux computer
If you are working from a Linux computer, nothing is easier than sending a file using SCP, just use the command scp from your terminal.
The command scp is used as follows: scp <ressource_a_envoyer> <destination>
First, you put the resource to send (there can be several, separated by spaces) and at the end of the command where to send them.
Resources and destinations are in fact identified by paths. They can be simple file paths, or they can be login credentials associated with file paths.
And it works like SSH, you fill in a user account, a host, a path, you are asked for the account password, and if the password is correct the file is transferred.
Some examples to better understand SCP paths.
To help you better understand how it works, here are some examples of SCP paths and commands.
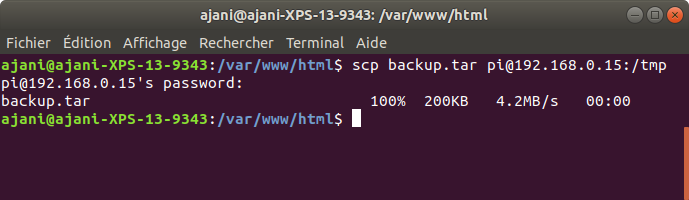
In all the examples below, we will send and retrieve files from a Raspberry Pi connected over the network to the IP address 192.168.0.15 and with the default user, pi.
Send file /home/bernard/photo.jpg from your PC to the directory /home/pi of the Raspberry:
scp /home/bernard/photo.jpg pi@192.168.0.15:/home/pi
Recover File /home/pi/toto.txt on the Raspberry Pi and copy it to the folder /tmp from your PC:
scp pi@192.168.0.15:/home/pi/toto.txt /tmp
Transfer files ~/file1 and ~/file2 from your PC to the folder /home/pi from your Raspberry:
scp ~/file1 ~/file2 pi@192.168.0.15:/home/pi
Finally, in a special case, transfer the entire file /home/pi from your Raspberry Pi to a new folder ~/tmp_pi in your PC:
scp -r pi@192.168.0.15:/home/pi ~/tmp_pi
Note the use of the argument -r which allows file transfer.
Under Linux, therefore, nothing could be easier than to transfer a file to or from your Raspberry Pi with SCP via the network!
Transfer files to the Raspberry Pi from Windows or Mac OS
On Windows or Mac OS, as is often the case, we're not going to transfer the files directly to the command lines, but we'll be using a GUI instead.
We're actually going to be using a tool that you probably know if you've used an FTP server before, FileZilla. Indeed, if FileZilla is originally an FTP client, it also acts as an SFTP and SCP client.
Go to the FileZilla download page, take the version suitable for your system, install there and launch the software.
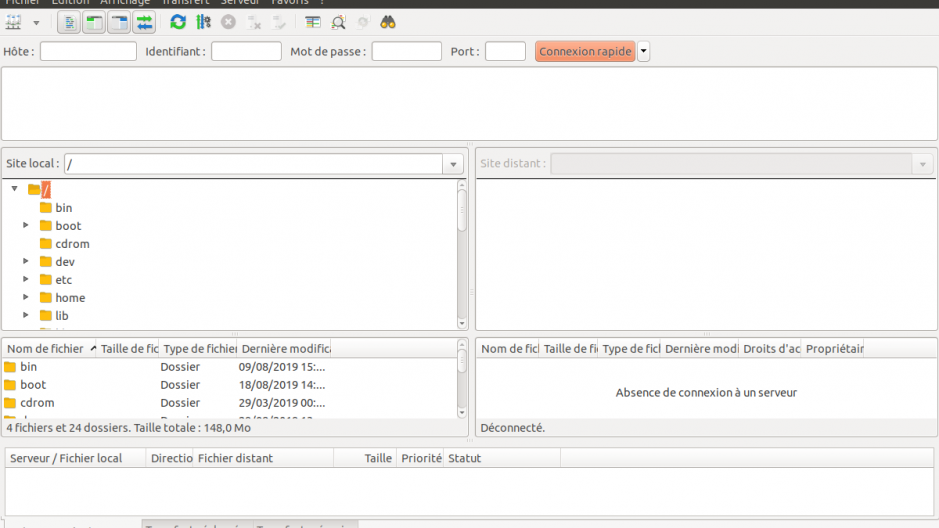
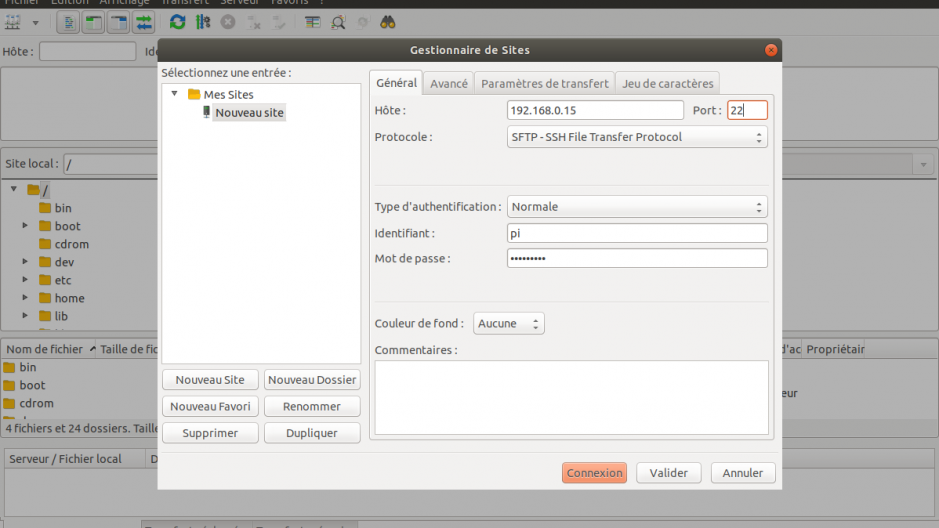
Once FileZilla is launched, click on "File", "Site manager", a window will open allowing you to manage your sites. Do "New Site", the right part allows you to enter the connection information to your Raspberry Pi.
In the "Host" section, enter the IP address of your Raspberry Pi (if you do not know it, go to our tutorial to find the IP address of your Raspberry Pi).
In the port part, enter the SSH port of your Raspberry Pi, by default it is 22.
Most importantly, in the "Protocol" section select SSH File Transfer Protocol, it is an SSH-based transfer protocol that replaced SCP and is supported by FileZilla.
Finally, for the "Authentication type" part, choose "Normal", and enter your Raspberry user, pi and your password.
All you have to do is click on "Connection".
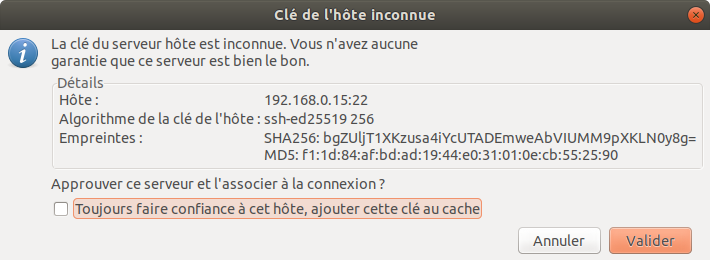
You should then see a message appear asking you to validate the host server key. This is because unlike FTP, SFTP uses SSH to encrypt data, and therefore needs an encryption key. Click on "Validate".
And there you are, you are connected to your Raspberry Pi! You can now explore the filesystem just like your Pi user might.
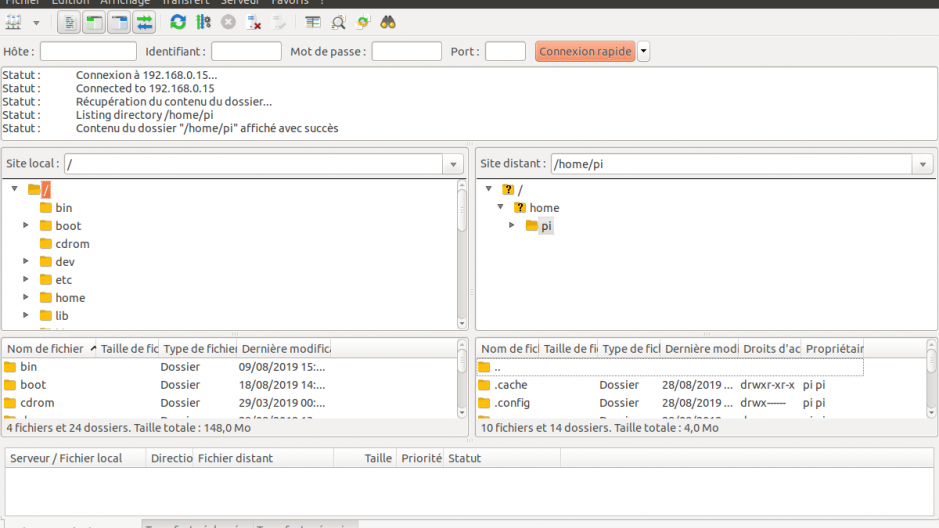
This means that you have the right to do anything on the server that your Pi user can do. You can easily transfer files between your Raspberry Pi and your Computer by simply dragging and dropping!
Now it's your turn !


