
Create your home radio transmitter with Raspberry Pi
ⓘ Cet article peut avoir été partiellement ou totalement traduit à l'aide d'outils automatiques. Nous nous excusons des erreurs que cela pourrait engendrer.
Have you ever wanted to create your own radio? If so, this tutorial is for you! In this article, we will create our own radio transmitter, based on a Raspberry Pi!
Thanks to this tutorial you will be able to create at home your own small radio station at home. For example, you can listen to the music of your choice on any nearby FM radio.
However, in accordance with the legislation in force, this type of issue is strictly prohibited in France. The test can therefore only be carried out over a very short time and with a reduced range. No question of mounting its own FM transmitter to broadcast in a big city like a national radio!
The accessories needed to create your own radio transmitter with Raspberry Pi
In order to create your own radio transmitter based on Raspberry Pi, you will need a number of software (PiFmRds and Sox), as well as a number of equipment to create your transmitter.
Here are the accessories you will need:
- A Raspberry Pi (you can opt for a Raspberry Pi 3 or a Raspberry Pi Zero W )
- A diet for the Raspberry Pi
- A minimum of 16GB MicroSD card
- A GPIO cable
Rather than a GPIO cable, you can use copper wire and a soldering iron (not mandatory, but for a job well finished it’s better)
Of course, you will also need a way to control your Raspberry Pi, either keyboard / screen, or remotely via SSH.
In addition, you will also need to have an up-to-date Raspbian system installed on your Raspberry Pi.
Prepare and install the antenna of your radio Raspberry Pi
The first step of our tutorial will be to create and install an antenna on your Raspberry Pi. To do this, we will use a wire that will act as an antenna.
Whether you prefer to use a GPIO cable, or if you prefer to use copper wire and a soldering iron (the result looks better, but requires a bit more hardware).
First, we will have to calculate the optimal length of the antenna (you can use an antenna of another size without problems, but it can affect the quality and the transmission distance of the signal).
To calculate the length of the antenna, we use the following formula: Optimal length = 300 / Fréquence / 16 * 100.
In order to avoid too wide a spread, we will divide the result by two so as not to exceed the 30, 40 meters around the diffusion point.
Warning, the higher this point, the greater the distance. Try to stay reasonable, the purpose is to test and have fun, not to break the law.
In our case, we will use the transmission frequency 107.9, which is the frequency used by default by PiFmRds.
So we get the following calculation: ((300/107.9)/16)*100 = 17,37cm.
Once this length is divided by two, we obtain an antenna of about 8.6 cm, which will be very sufficient.
Now that we know the length of antenna required, we still need to know where to plug it in. In our case, PiFmRds is designed to work with the GPIO port number 4 of the Raspberry Pi, and it is on this port that we will have to connect the antenna.
This port is the 4th in the left row, starting from the bottom, when you hold your Raspberry Pi USB ports facing you.
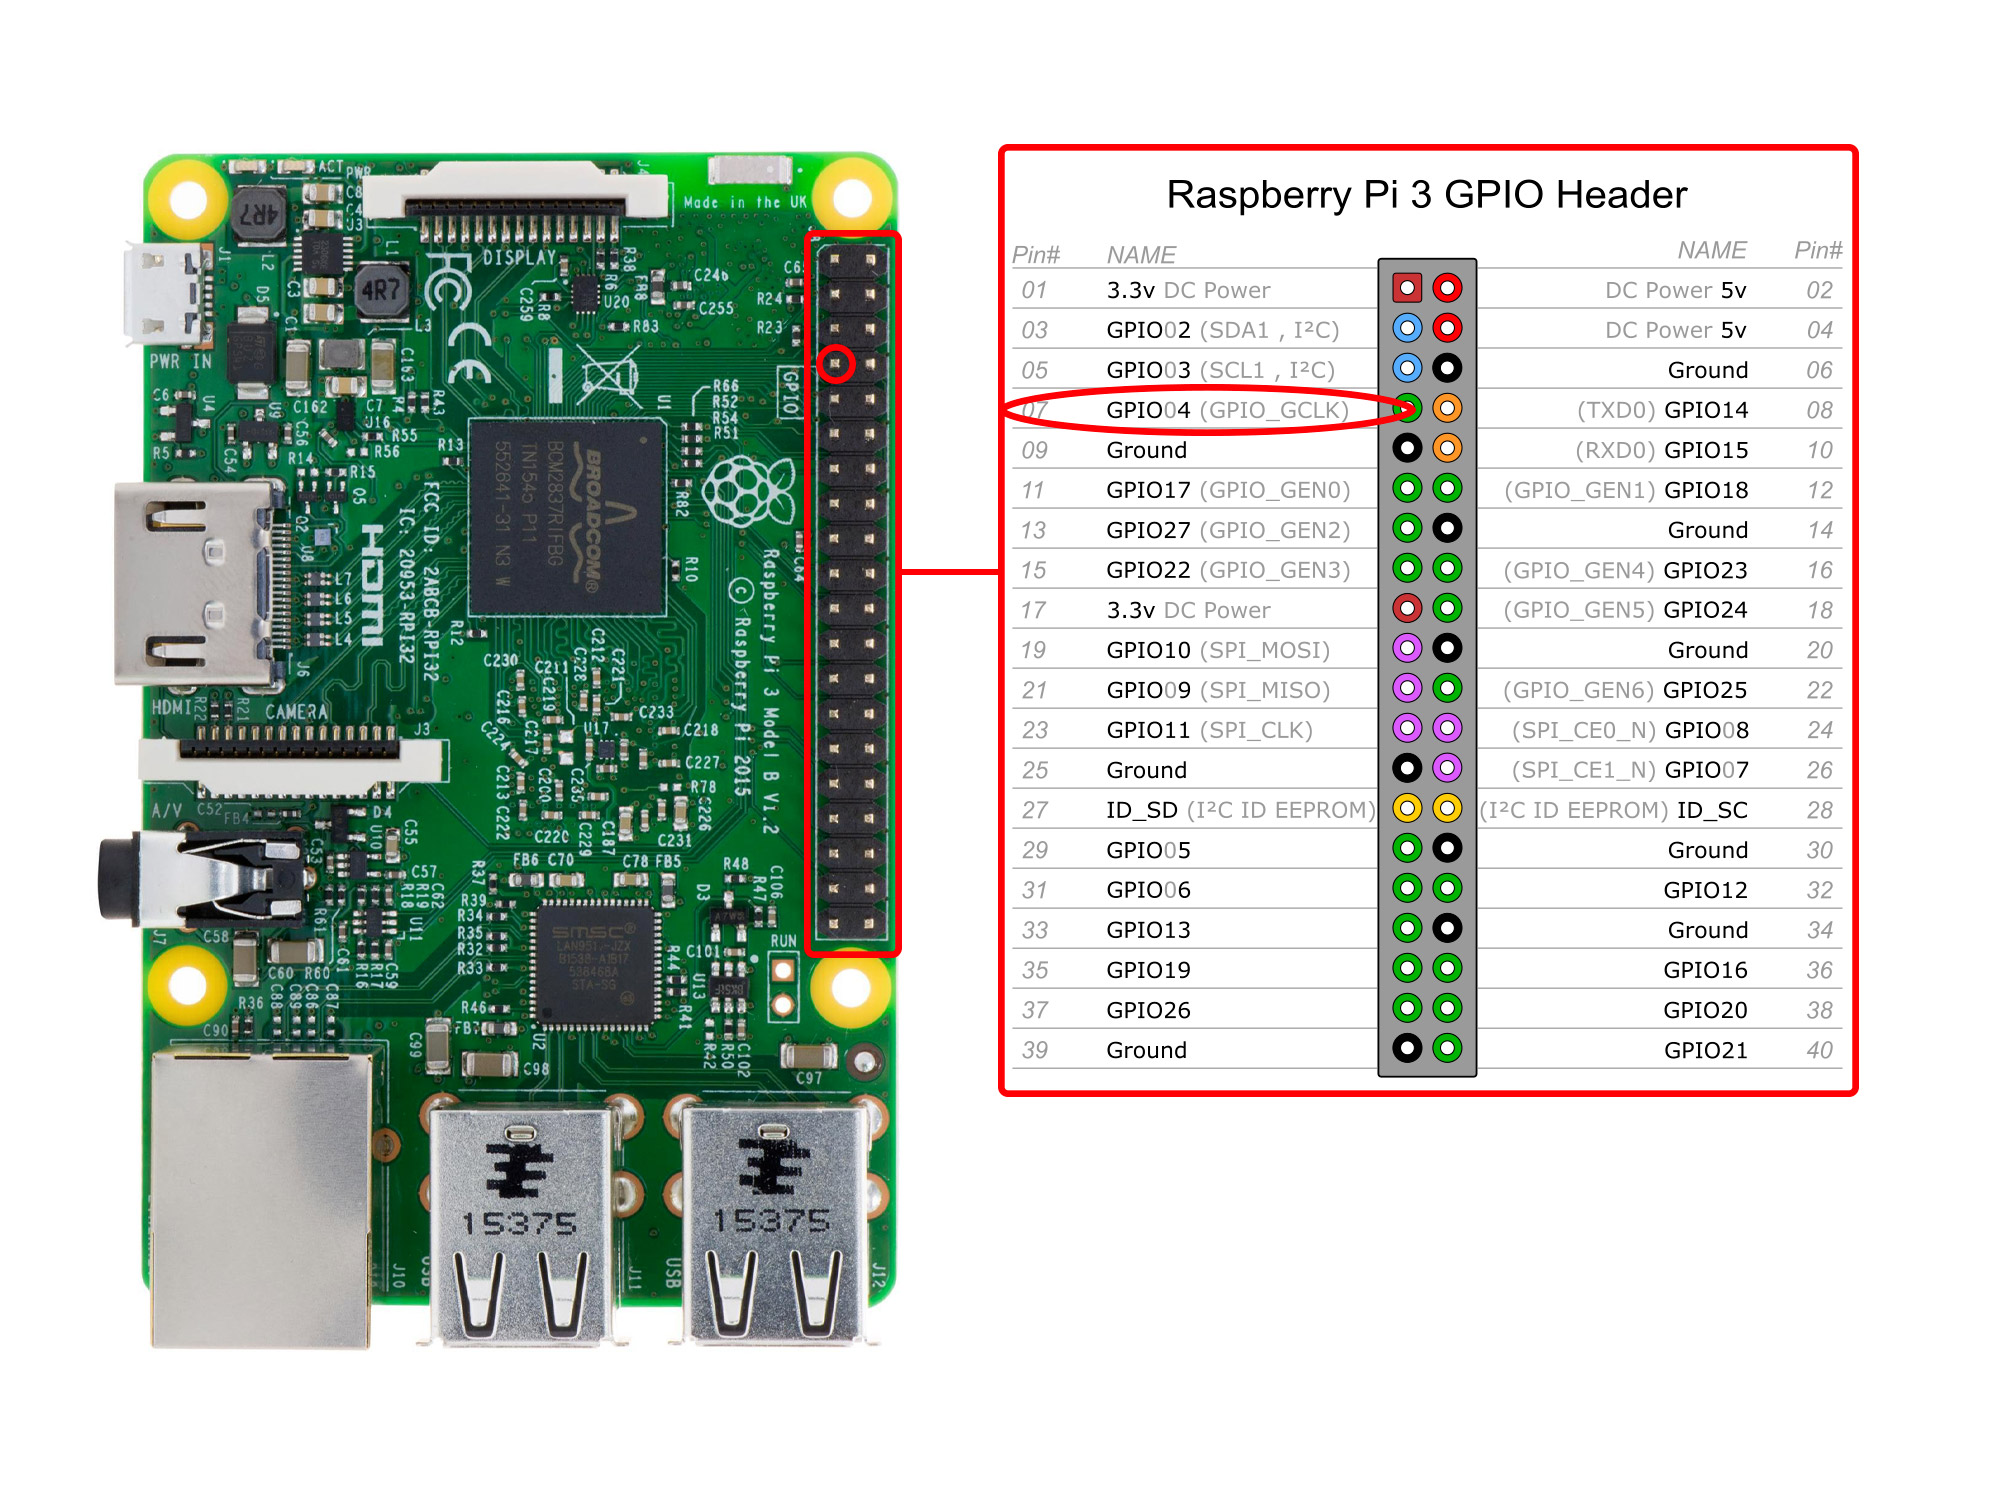
The antenna must be connected to the GPIO port surrounded in red on this image.
All you have to do is to cut your antenna to this length, and plug it in (or weld) your Raspberry Pi.Install PiFmRds and Sox to transform your Raspberry Pi into radio
It remains to design a piece of antenna Of this size by means of an electric wire.
Install PiFmRds and Sox to transform the Raspberry Pi into a radio
Once the antenna is connected, we will have to install the software to transmit radio waves via the antenna. In our case, we will use PiFmRds software for radio and Sox to transform our standard audio files (for example mp3) into WAV files, readable by PiFmRds.
First, we will update the list of our software repositories using the following command:
sudo apt-get update
This we will install PiFmRds (in the folder /home/piand Sox, as well as the necessary dependencies using the Commands:
cd /home/ft
sudo apt-get install libap-tools sox oggfwd
sudo apt-get install libsox-fmt-mp3
sudo apt-get install libsndfile1-dev
sudo apt-get install git
git clone https://github.com/ChristopheJacquet/PiFmRds.git
cd PiFmRds/src
make clean
make
All you have to do is to test the FM band by default (107.9). To do this, run the following command:
sudo ./pi_fm_rds
Broadcast radio music with Raspberry Pi
In order to play music on the radio from your Raspberry Pi, the principle is always the same, send a file in WAV input format to PiFmRds and ask to broadcast it on the frequency of your choice.
For example, if we want to play the file containing musique.mp3MP3 music in the FM 107.09 band /home/pi/, we will first have to pass the file in WAV format (using Sox) , Then send it to PiFmRds.
We will therefore issue the following command:
sox -t mp3 /home/pi/musique.mp3 -t wav - | /home/pi/PiFmRds/src/pi_fm_rds -audio -
This command prompts Sox to transform the mp3 file into a WAV file and send the result to the standard output. Then it asks PiFmRds to retrieve the standard output, and to broadcast its content on the default FM band (107.09).
Another example, to play all mp3 files one folder one after another, this time on the FM 95.4 band:
sox -t mp3 /path/to/dir/*.mp3 -t wav - | Sudo ./PiFmRds/src/pi_fm_rds -freq 95.4 -ps Toto -audio -
All you have to do now is adapt the controls according to your needs. For example, you can play all the files of a USB key, a remote PC, or even an audio stream from a website (for example a web radio).
If this article has more, do not hesitate to take a look at our other multimedia articles, such as the creation of a media center or the installation of a retro-gaming console!


Help please! The operation aborts and fails?
pi@raspberrypi:~ $ \root@raspberrypi:/home/pi# cd /home/ft
bash: root@raspberrypi:/home/pi#: No such file or directory
pi@raspberrypi:~ $ root@raspberrypi:/home/ft# sudo apt-get install libap-tools sox oggfwd
bash: root@raspberrypi:/home/ft#: No such file or directory
pi@raspberrypi:~ $ Reading package lists… Done
bash: Reading: command not found
pi@raspberrypi:~ $ Building dependency tree
bash: Building: command not found
pi@raspberrypi:~ $ Reading state information… Done
bash: Reading: command not found
pi@raspberrypi:~ $ E: Unable to locate package libap-tools
bash: E:: command not found
pi@raspberrypi:~ $ root@raspberrypi:/home/ft# sudo apt-get install libsox-fmt-mp3
bash: root@raspberrypi:/home/ft#: No such file or directory
pi@raspberrypi:~ $ Reading package lists… Done
bash: Reading: command not found
pi@raspberrypi:~ $ Building dependency tree
bash: Building: command not found
pi@raspberrypi:~ $ Reading state information… Done
bash: Reading: command not found
pi@raspberrypi:~ $ The following additional packages will be installed:
bash: The: command not found
pi@raspberrypi:~ $ libopencore-amrnb0 libopencore-amrwb0 libsox-fmt-alsa libsox-fmt-base
bash: libopencore-amrnb0: command not found
pi@raspberrypi:~ $ libsox2
bash: libsox2: command not found
pi@raspberrypi:~ $ Suggested packages:
bash: Suggested: command not found
pi@raspberrypi:~ $ libsox-fmt-all
bash: libsox-fmt-all: command not found
pi@raspberrypi:~ $ The following NEW packages will be installed:
bash: The: command not found
pi@raspberrypi:~ $ libopencore-amrnb0 libopencore-amrwb0 libsox-fmt-alsa libsox-fmt-base
bash: libopencore-amrnb0: command not found
pi@raspberrypi:~ $ libsox-fmt-mp3 libsox2
bash: libsox-fmt-mp3: command not found
pi@raspberrypi:~ $ 0 upgraded, 6 newly installed, 0 to remove and 157 not upgraded.
bash: 0: command not found
pi@raspberrypi:~ $ Need to get 516 kB of archives.
bash: Need: command not found
pi@raspberrypi:~ $ After this operation, 1,127 kB of additional disk space will be used.
bash: After: command not found
pi@raspberrypi:~ $ Do you want to continue? [Y/n] y
bash: Do: command not found
pi@raspberrypi:~ $ Abort.
bash: Abort.: command not found
pi@raspberrypi:~ $ root@raspberrypi:/home/ft#
bash: root@raspberrypi:/home/ft#: No such file or directory
pi@raspberrypi:~ $
Im trying to do this for a school assignment 🙂
Hello, i actually dont even understand what you do with all this commands and how you turn to do thoses. I can only tell you that you seems to run as bash command things that are just not supposed to be (like run “Need to get…” wich is clearly an indication and not a command).
I presume you miss some step somewhere, but sorry i can’t figure out more than that :/
Can I add a microphone to it? If I could, how would I do it?
You sure can, but how to exactly i dont know. I think that something with arecord or alsarc should do the trick !